


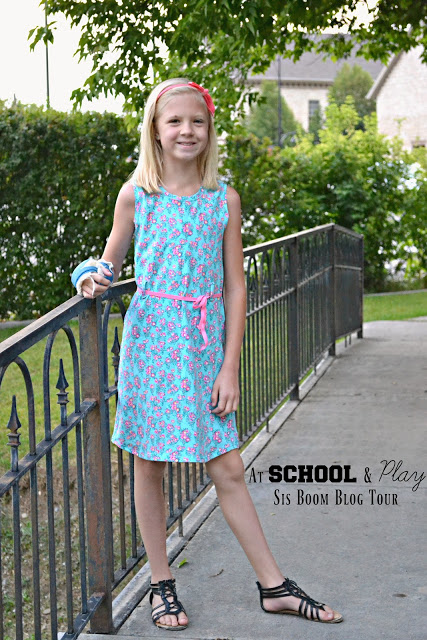
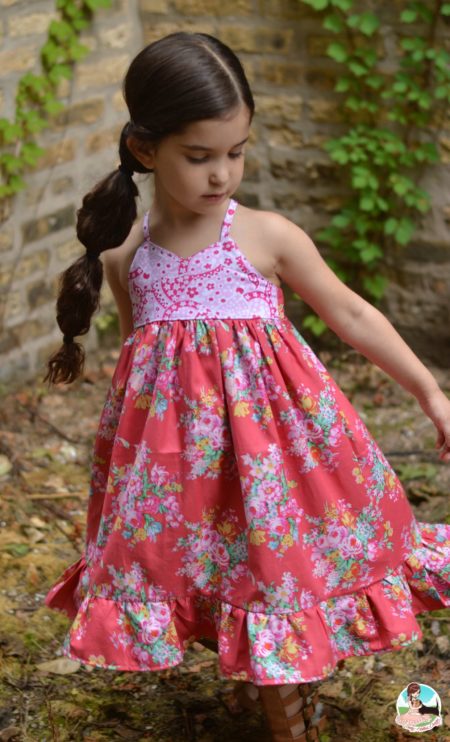
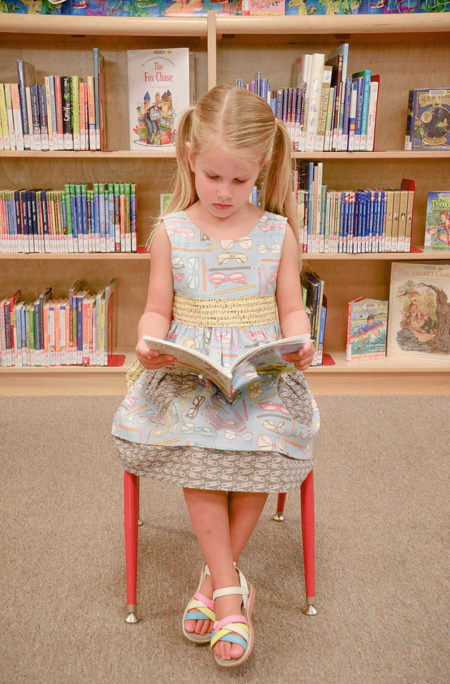
Merav, of Baby Hobbes Design, is back again and shows you how she did the
reverse scoop curve on her Mary Fancy Sash Dress. The fabric used for this project is Sophia and Terrie, both in Green from the Hotel Frederiksted collection due out in November. Girl’s World patterns are only available as paper patterns in the back of the book, so make sure you grab yourself a copy off Amazon. It’s filled with 21 amazing projects for girls of all ages. As always, thanks Merav for all you do for Sis Boom. Make sure to follow Merav on Instagram and Facebook for more inspiration.
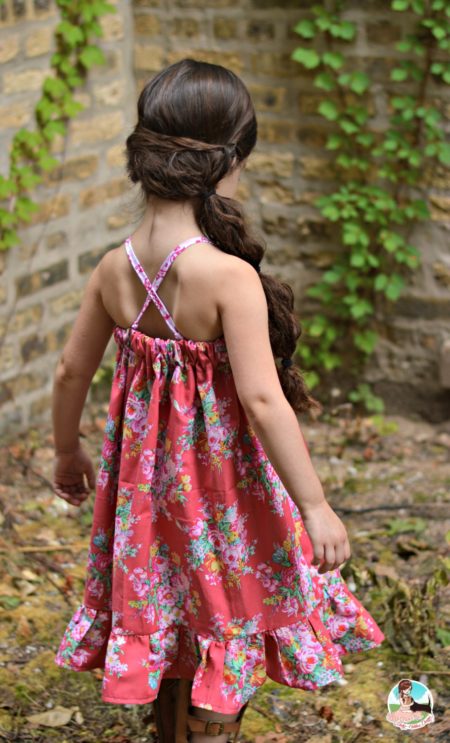
Hey hey! I am back again, this time with the inside scoop on how to add that ‘reverse scoop’ curve to your Mary Fancy Sash pattern. Last week I shared with you my take on the pattern for my new line of separates. I am all about sewing tops, skirts and pants this fall for Hobbes B2S wardrobe, so she can mix and match mama-made goodies with store bought tops and pants.
I love this pattern for it easy-fit feel. Hobbes loves dressing herself in the morning, and this top (or dress version) just slips on over the head, without zippers or buttons to close. As previously shown, I made three easy tweaks to the pattern: turning into a tunic, lining it so I can skip the bias tape and cutting the front bodice on a curve to add a bit more volume and bounce to the top.
It’s really easy to add a curve to your bodice. Just as long as you follow these SIX easy steps.
1) Be AWARE of your fabric pattern. Check the size of your bodice. A curve bodice on a smaller pattern may mean that your LARGE center flower in your fabric may be cut off. Play around with your precious fabrics before you cut.
2) Trace (if using Mary Fancy Sash from Girls World) or print and cut your pattern according to size.
3) After tracing or cutting your bodice, place it in front of you. Sis Boom Patterns are usually graded on a half bodice, see how I laid my front bodice?
4) Locating the bottom corner of the center bodice (this will be on the side with the word fold) decide on how wide of a scoop or curve you want in the top. Remember that you need to add length to the skirt to accommodate what you removed from the top) otherwise it will be too short. For this top, I measured 1.5 inches from the bottom and marked it with a dot.
*****When curving a top, you will start at the bottom edge under the arm and create a 25-40 degree line to meet the dot on the opposite side.
5) Draw curve your line.
6) Re-cut your pattern with the curve.
That’s all sewing friends! It’s so simple to add a bit of curves in your dresses and tops.

Till next time, happy sewing!
-Merav @ Baby Hobbes Design
We hope you all enjoyed the blog tour as much as we did! Here is a quick recap of what we saw on the tour!
Day 1: We were at Paisley Roots and her adorable KNIT tobago!
Day 2: We visited Tina Sew Tiny where we got a little tutorial for the Leighanna

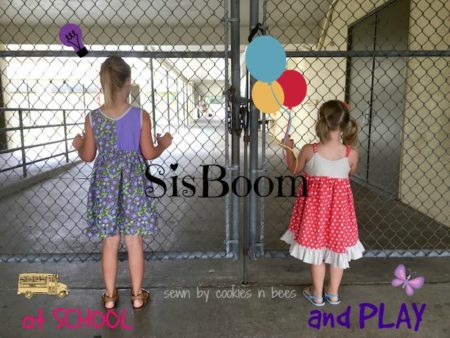
Day 3: Cookies n’ Bees showed us TWO outfits! the Sally and the Kelsey – with a Kelsey tutorial!
Day 4: We learned from Screeching Dinosaur just how playable the Jeanine Jumper is!

Day 5: Pear Berry Lane shows us some adorable and trendy Katie Fancy Pants

Day 6: Troops to Tots did THREE stunning and unique Maddie’s! Check out the back bow using our FREE Beatrice pattern on one of her Maddie’s!

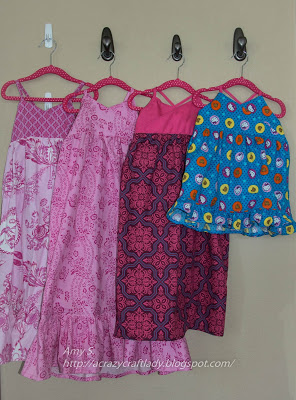
Day 7: We see a whole wall of Kelsey’s in all the different lengths from Crazy Craft Lady.
Day 8: Glitter in my Coffee wowed us all with her rainbow Marissa dress!

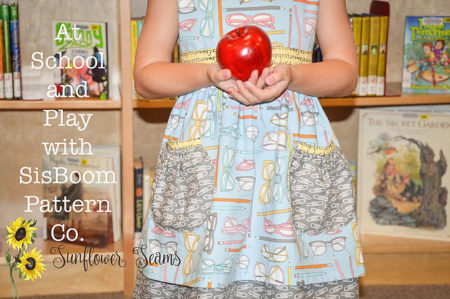
Day 9: We got a free pocket pattern for the Sally dress from Sunflower Seams.
Day 10: Adventures with Bubba and Bug shows how great the Katie’s and Tobago are together!

We want to give a HUGE HUGE thanks to all the bloggers for participating in the blog tour and hope you all enjoyed the inspiration the past 2 weeks!
Now we have a final bit of inspiration for you from Merav of Baby Hobbes Designs!

Have you ever downloaded a Digital PDF Sis Boom Pattern and went “SIGH” the moment you noticed that the page number total is at a whooping 150 pages? I have in the past, and I must admit I was a bit overwhelmed the very first time I opened a Sis Boom pattern. What I didn’t realize right away (and thankful for Facebook Sis Boom Pattern Co Sewing Group members who are always willing to help guide and motivate you) was that this 150 page pattern is actually a FULL SEWING LESSON .
Although it feels as if I have sewn for over a decade, I only started sewing clothes for Baby Hobbes Design three years ago. As a self-taught sewist, I can honestly say that a lot of my basic fundamentals and sewing skills can be attributed to the sewing lessons in each Sis Boom pattern. From a loaded glossary of terms and how-to tricks, to a complete guide to measurements, computerized drawings as well as photos of how the garment will look at every stage; a beginner can feel at ease choosing a Sis Boom pattern. One of my favorite features in most Sis Boom patterns is that each size is digitized on it’s own page (hence the large file). Since I mostly sew for Hobbes, I love just being able to print the page in her size without other line drawings and sizes to confuse me.
Ready to try you first Sis Boom pattern? Take a look at Sis Boom Kelsey I sewed up for Hobbes Back 2 School collection featuring Hotel Frederiksted fabrics-coming in November. This pattern gets my beginners friendly stamp-of-approval, and comes with all the bells and whistles-but with a 52 page total. You’ll get 23 pages of step-by-step directions followed by 29 pages of single filed bodice patterns, separated by size. For Hobbes size 4 dress, I printed a total of 2 pages. How’s that for being overwhelmed?

Till next time, happy sewing!
-Merav @ Baby Hobbes Design
Final day of our At School and At Play Sis Boom Blog Tour! Today Adventures of Bubba and Bug shows you the Katie’s Fancy Pants and Tabago Top. Check it out and say hello in the comments.
Don’t forget to use our 40% off with code -BACK2SCHOOL – in our Pattern Shop or Etsy shop! Sale ends TODAY. If you have any questions about our patterns (or sewing in general), join our Sis Boom Pattern Facebook Group. Come chat with over 2,000 members who love sewing and Sis Boom fabrics and patterns!
Thanks to all our amazing blog tour bloggers. We appreciate you so much. Don’t forget to visit EACH blog on the tour and leave a comment on their comment section to be entered to win the pattern they sewed. Contests end TONIGHT, the last day of our tour! So go back and comment, if you haven’t on all the blogs from this week AND last week. All the links are below for easy reference!
August 22 Paisley Roots / August 23 Cookies n’ Bees / August 24 Tina Sew Tiny / August 25 Screeching Dinosaur / August 26 PearBerry Lane / August 29 Troops To Tots / August 30 A Crazy Craft Lady / August 31 Glitter in My Coffee / September 1 Sunflower Seams / September 2 Adventures with Bubba and Bug
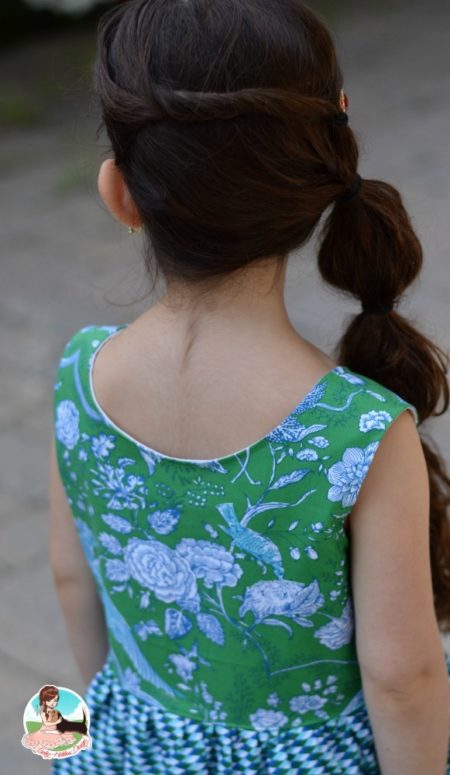
Merav, of Baby Hobbes Design, is back and does a stunning version of the Mary Fancy Sash Dress. The fabric used for this project is Sophia and Terrie, both in Green from the Hotel Frederiksted collection due out in November. Girl’s World patterns are only available as paper patterns in the back of the book, so make sure you grab yourself a copy off Amazon. It’s filled with 21 amazing projects for girls of all ages. We are so thankful for Merav and her beautiful creations in Sis Boom fabric. Make sure to follow her on Instagram and Facebook for more inspiration.

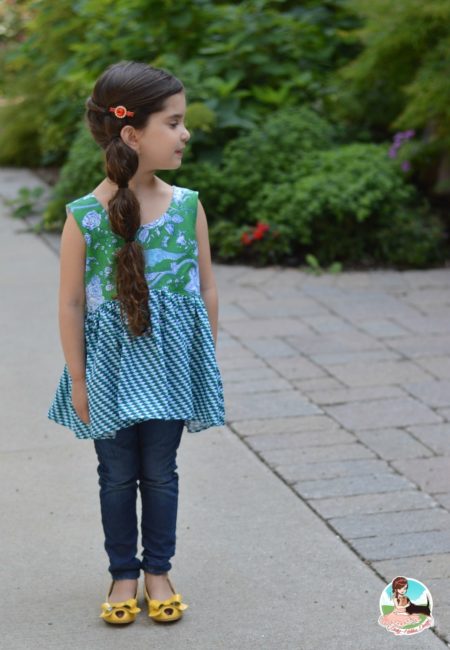
Hello again! I am so excited to take over Sis Boom today, and to share one my favorite Back 2 School (B2S) looks. Before I go any further, let me wipe away my tears thinking about Hobbes starting 1st Grade soon. When did this happen? All summer long we’ve been excited for this advancement, and now, I am heavyhearted over this huge milestone.
I am, however, fired-up about all the new B2S looks I am sewing lately. Especially previewing Sis Boom’s new collection Hotel Frederisksted. The pop of colors on this 18-fabric collection is mind-blowing. From soft reds with the hint of pink, to sapphire blue, and of course this gorgeous emerald green. This collection is FIERCE! Especially paired with Sis Boom pattern collections.
One of my goals for B2S sewing with Hobbes is to sew separates. I want to give her the flexibility to mix her handmade collection with ready-to-wear jeans and tees from our local shops. Because each Sis Boom pattern is filled with details to achieve the perfect individual fit, I start with my finished look measurements and work backwards, modifying the garment for my ideal look. This time, reaching to my favorite printed pattern books: Girls World
I chose to work with the awesome Mary Fancy Sash Dress Pattern from Girls World, because I love the ease of the pullover dress. No zippers and no buttons means this mommy can finish her coffee in the morning while Hobbes dresses herself. I made 3 easy tweaks to the pattern. The most obvious one is that I left out the sash and turned it into tunic length. The second change was that I lined it. It doesn’t need lining at all, because the pattern calls for bias trim to finish all the edges. I have to come forward and express that bias bonding and I don’t always get along. Honestly, to save on topstitching time I just cut a lining piece of both the front and back and zipped it through my serger as you would with any other tank style lined dress.
The biggest transformation to the pattern was how I cut the front bodice piece (top and lining) on a curve. I love the look and volume that a curve bodice gives to our tops and dresses, that I decided this Fall, Baby Hobbes Design’s collection needs to be cut on a curve. To achieve this look, I took the front bodice pattern-locating the side with the word fold and starting from the bottom, I measured 1.5 inch up. I marked it. Then I located the opposite edge of the side of the bodice under the arm curve. From there I drew a line on a curve, meeting at the 1.5 mark that I made on the other side, and voila, you’ve curved your bodice.
* To see the tutorial on how I did this, stay tuned for my next Sis Boom guest blog post – I’ll share more of this technique.
Till then, Happy Sewing!
Merav from Baby Hobbes Design
Our little blog tour only has 2 more days to go. Hope you have enjoyed the tour as much as we have! Sunflower Seams made the sweetest Sally Dress with pockets. Learn how she did it on her blog today.
Don’t forget to use our 40% off with code -BACK2SCHOOL – in our Pattern Shop or Etsy shop! Sale ends tomorrow, so stock up on all your favorite Sis Boom patterns before 9/2. If you have any questions about our patterns (or sewing in general), join our Sis Boom Pattern Facebook Group. Come chat with over 2,000 members who love sewing and Sis Boom fabrics and patterns!
As our blog tour winds down, don’t forget to visit EACH blog on the tour and leave a comment on their comment section to be entered to win the pattern they sewed. Contests end tomorrow 9/2, the last day of our tour! So go back and comment, if you haven’t on all the blogs from this week AND last week. All the links are below for easy reference!
August 22 Paisley Roots / August 23 Cookies n’ Bees / August 24 Tina Sew Tiny / August 25 Screeching Dinosaur / August 26 PearBerry Lane / August 29 Troops To Tots / August 30 A Crazy Craft Lady / August 31 Glitter in My Coffee / September 1 Sunflower Seams / September 2 Adventures with Bubba and Bug

copy the code below to
put the Sis Boom badge on your site

copy the code below to
put the Girls World badge on your site


- Archives -
- February 2018
- October 2017
- September 2017
- August 2017
- July 2017
- June 2017
- May 2017
- April 2017
- March 2017
- February 2017
- January 2017
- December 2016
- November 2016
- October 2016
- September 2016
- August 2016
- July 2016
- June 2016
- May 2016
- April 2016
- March 2016
- February 2016
- January 2016
- December 2015
- November 2015
- October 2015
- September 2015
- August 2015
- July 2015
- June 2015
- May 2015
- April 2015
- March 2015
- February 2015
- January 2015
- December 2014
- November 2014
- October 2014
- September 2014
- August 2014
- July 2014
- June 2014
- May 2014
- April 2014
- March 2014
- February 2014
- January 2014
- December 2013
- November 2013
- October 2013
- September 2013
- August 2013
- July 2013
- June 2013
- May 2013
- April 2013
- March 2013
- February 2013
- January 2013
- December 2012
- November 2012
- October 2012
- September 2012
- August 2012
- July 2012
- June 2012
- May 2012
- April 2012
- March 2012
- February 2012
- January 2012
- December 2011
- November 2011
- October 2011
- September 2011
- August 2011
- July 2011
- June 2011
- May 2011
- April 2011
- March 2011
- February 2011
- January 2011
- December 2010
- November 2010
- October 2010
- September 2010
- August 2010
- July 2010
- June 2010
- May 2010
- April 2010
- March 2010
- February 2010
- January 2010
- December 2009
- November 2009
- October 2009
- September 2009
- August 2009
- July 2009
- June 2009
- May 2009
- April 2009
- March 2009
- February 2009
- January 2009
- December 2008
- November 2008
- October 2008
- September 2008
- August 2008
- July 2008
- June 2008
- May 2008
- April 2008
- March 2008
- February 2008
- January 2008
- December 2007
- November 2007
- October 2007
- September 2007
- August 2007
- July 2007
- June 2007
- May 2007
- April 2007
- March 2007
- February 2007
- January 2007
- December 2006
- November 2006
- October 2006
- September 2006