Sis Boom Super Fans: Tracey and Chantelle Walker

Meet mother and daughter quilters, Tracey and Chantelle from Australia. We love this sweet story of Tracey and Chantelle quilting togethering, allowing them to slow down and bond in our fast-paced, hectic world.

I’m Tracey, mother to Chantelle, 15 years of age and wife to Shane. We moved from Victoria to the beautiful Swan Valley Region in Western Australia 10 years ago and fell in love with how relaxing it was.

I started quilting after watching my mother make a small quilt for Chantelle when she was a baby. Internet and books were my friends and I’ve learnt from lots of mistakes. The quilts I make have been for my nieces, nephews and of course Chantelle.

In 2012 I discussed with Chantelle learning to sew so that we could spend time together after school and work and talk about how her week had been. She didn’t take to making clothes. In 2013 she made the transition to quilting and hasn’t looked back. Chantelle has made a number of quilts, mainly for herself but has given a couple to friends. Last year we met another West Australian quilter, the one and only Edwina Foskew. This is when we first heard of Jennifer Paganelli and were introduced to the fabrics. Chantelle was gifted some Jenny Eliza and fell in love with the colours and prints. Edwina also encourages Chantelle in all her sewing and fabric buying. She’s yet to use it, waiting for the perfect project.

This year we encouraged Chantelle to create her own facebook page, Chantelle’s Sewing Adventures to show her creations and to be proud of what she does. She’s also started working at Handcrafters House, our local quilt store, gaining more experience from the talented team.

We have been blessed to have a fantastic network of family and friends who encourage Chantelle with her quilting.

Tracey’s Felicity’s Quilt using Jenny Eliza II

Chantelle

Chantelle’s Beauty Queen rectangle quilt

chantelle2

Chantelle’s Good Company Cushion

chantelle3

Guest Blogger Tamara Harrison

We are truly lucky to have the uber talented Tamara Harrison show us how she creates her AMAZING fabric flowers. Tamara lives in West­ern Australia and combines her love of jewelry making, millinery tech­niques, and floristry skills into a stunning wedding business. We fell in love with her flowers when they showed up on our Instagram feed and she graciously agreed to do a guest blog post.

Be sure to visit Tamara at:
www.tamaraharrison.com.au
Instagram
Facebook

fabricflower3

fabricflower6

When people ask me what I do, I usually say, ‘I make pretty things’, this is often met with ‘what do you mean, what kind of pretty things?’, so I show them my website or Instagram feed and get an ‘OOhhhh, OOooooo, Ahhh I seeeee’. I have to admit, I LOVE this response because of the joy and curiosity it brings.

Arriving here at the ‘I make pretty things’ place has been a culmination of being trained in Floristry & Art, owning floral design shops, making hundreds of wedding bouquets, lecturing in the subject, coming in and out of the creative terror zone and combining all those skills with new ones to make amazing things for events and home.

I am inspired by all things around me and I constantly have to ‘get the creativity out’ otherwise I go a bit batty (It’s true!).

My latest ‘pretty thing’ has been to use my french flower making skills to design fabric flowers. I have become quite obsessed with making them and how beautiful they look in Sis Boom fabric.

Here are some stages of construction. Each flower takes several hours to complete.

Images 1 & 2: Cut out your petal shape in 5 or 6 sizes small through to large. I cut approx 8 in each size (I may not use them all in 1 flower).

_
Flower1flower2
_

_

Images 3 & 4: Paint with a fabric stiffener and allow to dry completely. I use my own special formula but watered down craft glue works really well (as long as it dries clear).
_
flower3FF1

_

Images 6& 7: Using hot brass flower making tools stretch and shape each petal until it looks three dimensional.

_
flower4flower5

_

Images 8, 9 & 10: Take a small handful of craft flower stamens and tightly twist a wire through the middle, bending the stamens in half to form a cluster. Sort your petals from smallest to largest. Starting with the smallest petal, take some clear drying craft glue and attach. You can sew your petals on if you prefer.

flower6flower7

_flower8

Images 11, 12 & 13: Keep gluing your petals gradually increasing them in size, Make sure to overlap with the previous petal. If in doubt grab a real rose and have a look at how nature arranges them!

flower9flower10
_
flower11

Image 14: Hang completed flower somewhere to dry overnight.
flower12

Image 15: Arrange your flower by fluffing up the petals and say WoooHoooo I’ve done it!!

flower13

You can then attach a clip, brooch backing or stem depending on how you’d like to use your amazing bloom!

flower_tamara2

flower_tamata

Guest Blogger: Baby Hobbes Designs

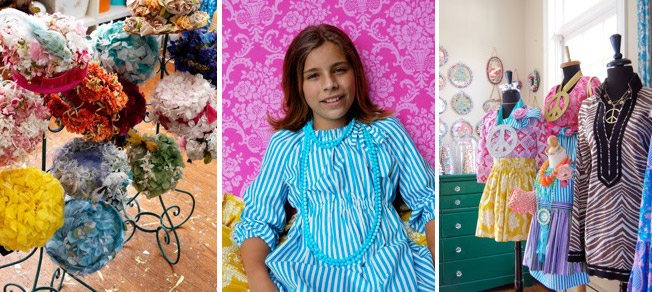
Chicago blogger and seamstress extraordinaire, Merav of Baby Hobbes Design, and her lovely daughter, Hobbes, return for their fourth blog post. We are thrilled to have them back. Enjoy their review of Gabriella Fae made with Sis Boom’s new line, Nostalgia and Merav’s lovely lace embellishments.


Nostalgic About My Gabriella Fae

Babyhobbes1

My best friend since Middle School is Gabriela; well now she goes by Gabi. She transferred into our school in 7th grade and quickly became my bestie. We did everything together-her parents used to call us “an old married couple” because we were inseparable. Though it’s been almost 15 years since we lived in the same time zone, I cherish our friendship and reminisce about our endless days together. One of our favorite past times was to wander around mall (yes, we were in the burbs of Long Island) while talking about clothes and the new style trends.

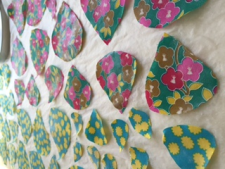
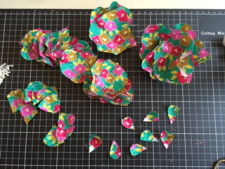
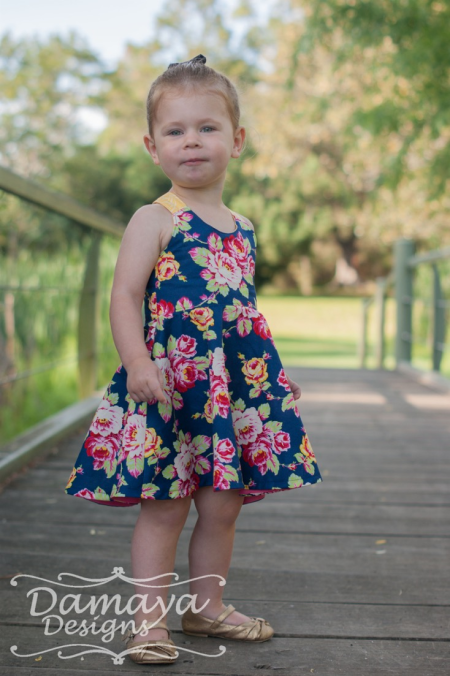
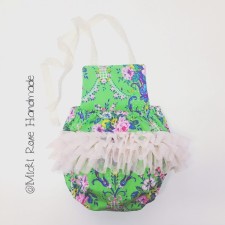
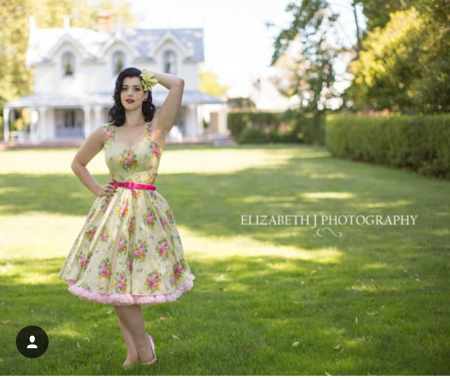
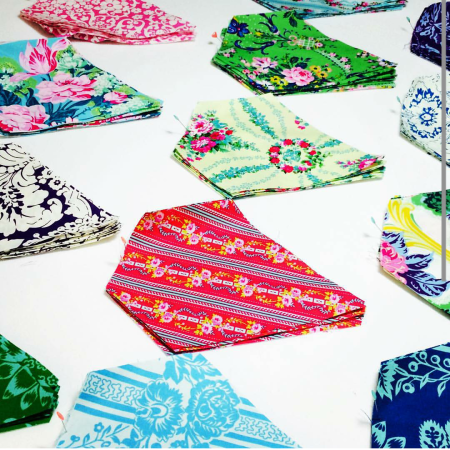
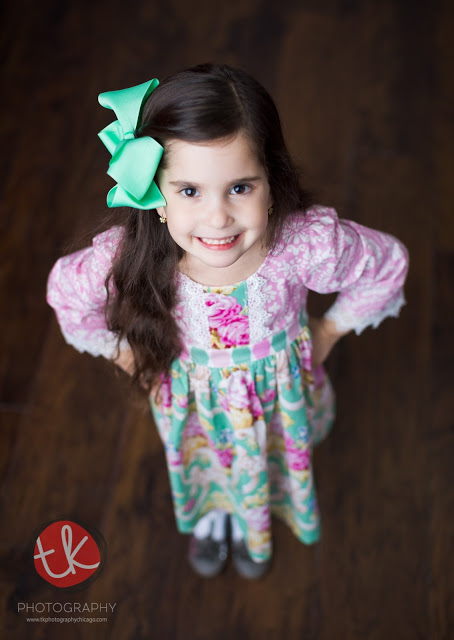
These days, my partner in fashion is my little 3 and a half foot tall Hobbes. We shop for fabric and talk about how to compliment and mix print. When Sis Boom Nostalgia arrived, with it’s soft pastel hues and large, bold flowers, I knew I wanted Hobbes to be involved in the dress making process. This time around (and with direction) she choose the pattern and the fabric placement. I was ecstatic when she chose Sis Boom Gabriella Fae; it reminded me of my favorite past time with my dear friend, Gabi. Kind of makes me nostalgic!

babyhobbes2
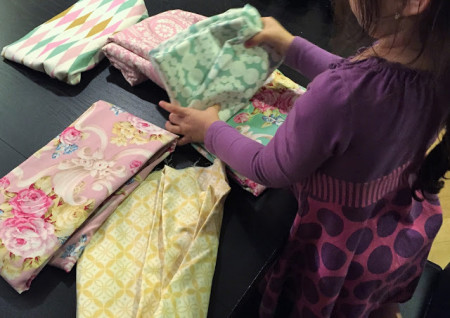
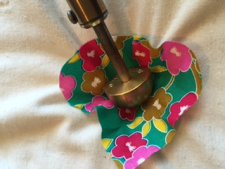
(Hobbes switching the Nostalgia fabrics in and out of Gabriella Fae waistband placement)

BabyHobbes3

babyhobbes4

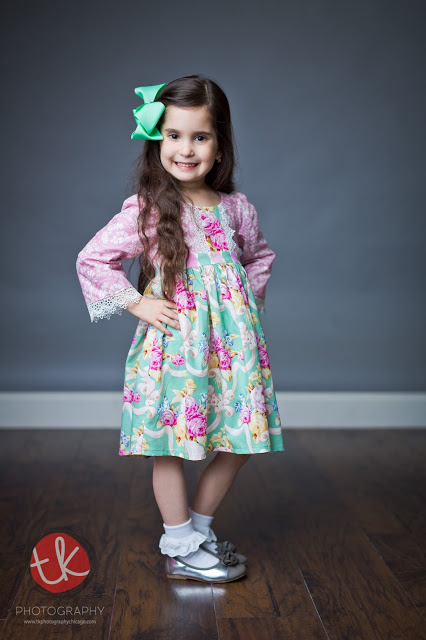
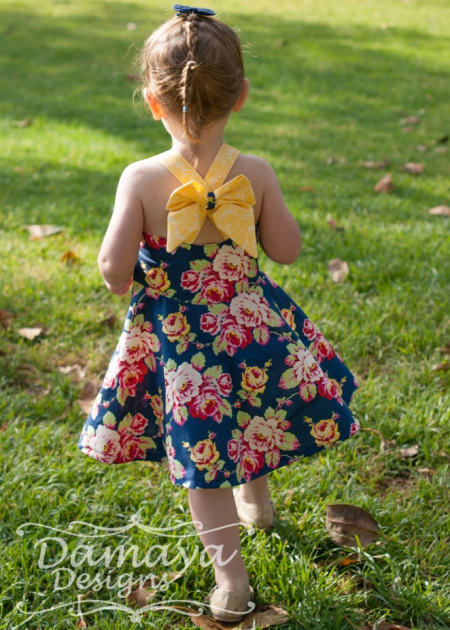
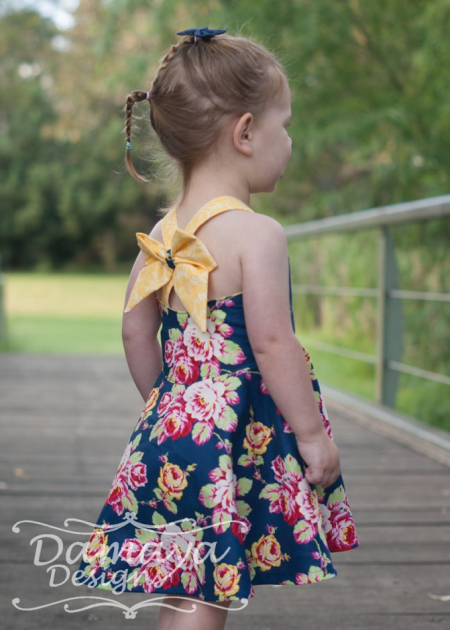
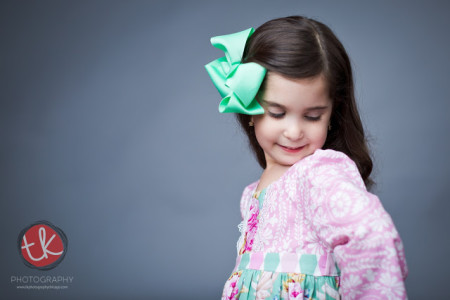
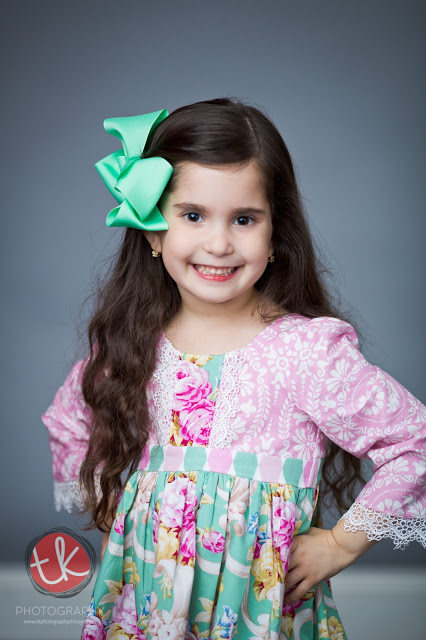
I was delighted when Hobbes chose for us to sew the Gabriella Fae PDF dress pattern. The Holidays are approaching and I wanted her to have a new dress for our Thanksgiving table. The scoop neck, empire bodice and the zipper back, along with the Nostalgia fabrics and the added lace trims (see how-to add the lace trim below) helped shape this dress into a One Of A kind, special occasion dress.
BabyHobbes-5

(Since Hobbes measures the same in chest/waist and hips, I chose to shorten my zipper to end at the gathered skirt)

BabyHobbes-6

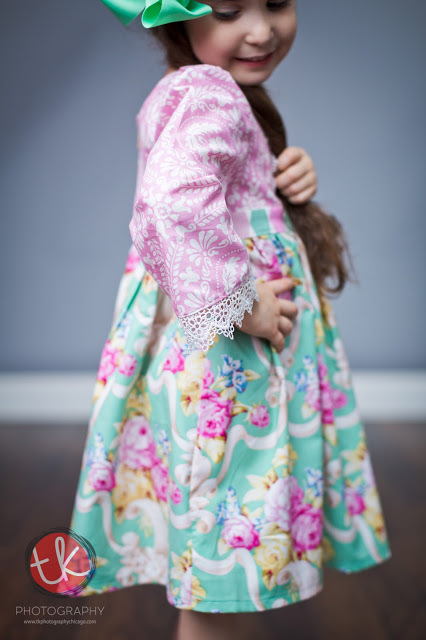
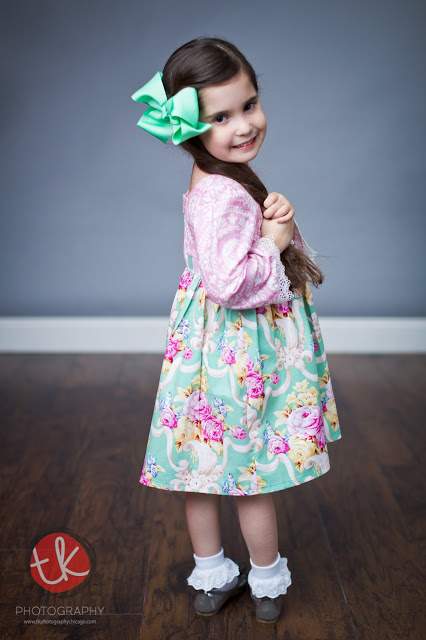
I love that this patterns sports sleeves in multiple lengths-perfect for year round dresses. We chose to sew long sleeve, leaving an inch off so we can add the 1 and 1/4 wide lace to the sleeve edge. The dress can be sewn in multiple lengths too. If you have your kid handy, you can measure down from the waist to your desired length. For my daughter, with a waist 21 and height 41.5, I chose to cut the 3T in the fully lined flat bodice and 16 inch length for the skirt.

BabyHobbes-7

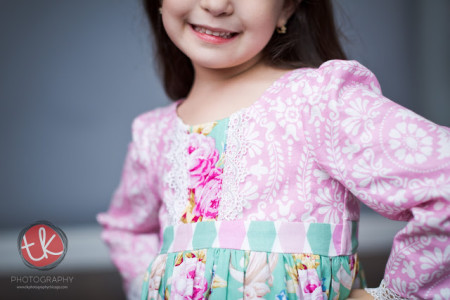
The dress bodice can be made using 2 different cuts. One is a smooth outer layer, like the one Hobbes and I made cut in order to add trim in the center. You can also chose the second option for a gathered front bodice for the perfect ruched look. There is even an option to add a bow at the waistband. So many possibilities!

BabyHobbes-8

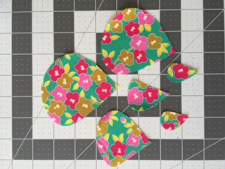
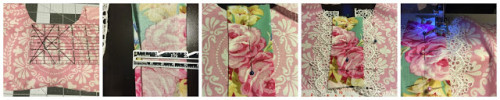
To create the trim for a flat bodice overlay and the sleeves, please follow the instructions below:

Looking at the picture below, and starting from LEFT:

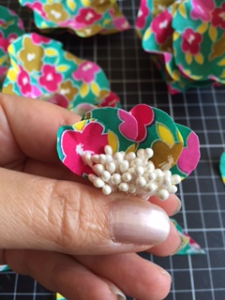
After you cut your flat bodice piece, measure how wide of an overlay you would like. For Hobbes size 4 bodice, I cut roughly a 2 and 1/4 piece and added an inch to the length. Make sure your design is centered.
Next, fold your edges under-1/4 on each side. Find the center of your bodice and place the overlay on top. Pin in the center.
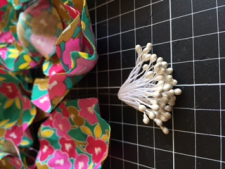
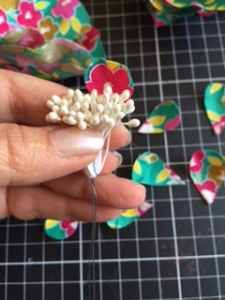
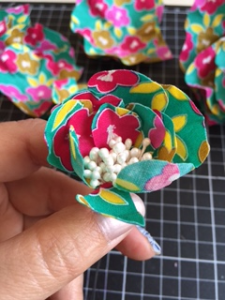
Cut two strips of lace-I like to cut about an inch longer so I can then match the curves on both sides. Tuck the lace under the folded edge, 1/4 of an inch on each side. Pin and sew.
babyhobbes9

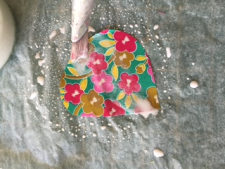
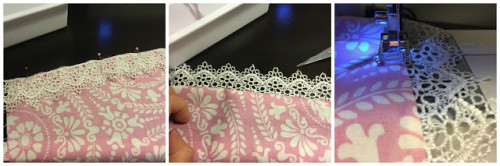
To add a lace trim around the sleeves, see picture below. Staring from the LEFT:
Take your raw end of your sleeve, right side up. Lay your lace piece right side down. Pin and Sew with a 1/4 inch seam allowance.
Fold over the lace, so that the seams are under. Press and top stitch 1/8 of an inch to tack it down.
*I added the lace before I sew the sleeves closed. It’s much easier that way. When you do close your sleeves, make sure you match the lace and the sleeve hem.

babyhobbes10

BabyHobbes-11

There you have it! Now you can embellish your Gabriella Fae’s sleeves and bodice just in time for the holidays. I hope you love it just as much as Hobbes and I do. And if you are sewing with your mini-me, share your pictures here.

Happy Sewing,
-Hobbes and Merav @ Baby Hobbes Design

As always, I love hearing from my crafty friends. Follow me at Baby Hobbes Design on Facebook or Instagram for updates, pattern review, One of A Kind dress-sales and giveaways.
Special thanks to my friends at TKPhotography Chicago for these gorgeous card-ready photos.
And if you don’t own it, get your copy of Sis Boom Gabriella Fae Here

Sis Boom Super Fans: Amaya and Miquita

It’s rolling into the summer season for all our Sis Boom Australia fans, so we couldn’t resist sharing this cutie in a lovely sundress featuring Marcella fabric from the Circa line when she showed up on our Instagram feed recently. Amaya and her mom, Miquita, live in the Hunter Valley of NSW, Australia. Miquita owns Damaya Designs, featuring handmade children’s clothing as well as patterns/tutorials for children’s activity items.

Miquita sewed this dress using the new Cross Bow Dress designed by BOO! Designs for the latest edition of One Thimble, an online quarterly e-zine out of Australia. Such a darling dress. You can find the PDF pattern here. Sew one today using the new Nostalgia line. Just sayin’….

Crossbow1
Crossbow2
crossbow3

Thanks for sharing with us Amaya and Miquita. Be sure to follow Damaya Desisgns on Facebook and Instagram.

Another Nostalgia Quilt Stunner

Uber talented Jo Avery has done it again with this masterful quilt using Sis Boom’s newest line Nostalgia. The quilt debuts on the cover of Issue 3 of Today’s Quilter available now. Pick up a copy today to learn how to make this gorgeous quilt. Jo uses Nostalgia for the bowls on the front and Elyse in Pink from the Caravelle Arcade line for the back. It reminds me a bit of vintage Pyrex bowls which have been a super hot collectable the last few years. Love how this quilt is modern and traditional at the same time. Thanks Jo, from bringing the Nostalgia line to life!

What have you been making with the Nostalgia line? Share with us on Facebook and Instagram. We love hearing from you.

dishes

dishes2
dishes3
TQdishes cover

Sis Boom Super Fan: Micki Rose Handmade

Meet Teigan Miller, the talent behind Micki Rose Handmade. She sews chic, boho inspired fashion for little ones and Jennifer is honored to be one of her favorite fabric designers! Follow Teigan on Instagram and Facebook to see more of her unique and lovely creations.

Gracie Vintage Romper Vintage Romper Back

___

I am the Mummy of 2, soon to be 3, very free-spirited children. My big boy, Braxton (3 years old) and Miss Micki Rose (18 months old). Together with my Husband, William, we live in a remote mining town in the middle of Western Australia, called Tom Price, where your nearest major fabric store is an 16 hour drive away! Needless to say the internet is my best friend when it comes to shopping!

I have to admit I haven’t been in the sewing game all that long, my love for sewing all started when I found out I was having a baby girl 2 years ago and from there I haven’t stopped creating. There is no better feeling then when you have finished an item and knowing that you created that magnificent item from scratch.

I started off sewing harem pant sets for my babies and from there things took off. Friends and people in our small town started requesting items and that’s when I decided to turn this little hobby into a small business. If you spoke to my husband, he would definitely say I have a fabric addiction, I just love sourcing vintage and unique fabrics, intricate lace trimmings, doilies and delicate embellishments. I love anything vintage, unique and playful florals, light cotton fabrics and all things girly! I remember the very first piece of fabric I purchased was from the Jennifer Paganelli Lucky Girl line, Vintage Marcella. My Mum and I sat up late one night making a cute little pair of Vinties (overalls) with a doily yoke and pearl buttons. That is definitely where my love for all things Jennifer Paganelli started.

If I was asked to describe my children’s label, I would say it has a unique, boho vintage feel for the free-spirited bubbas out there. My most favourite items to create would have to be my rompers, they have a very whimsical bohemian feel to them! I try to ensure each item is one of a kind and when possible, try not to duplicate things.

Bloomer Set 1

Bloomer Set 2

Boho Seaside Romper

Sis Boom Guest Blogger: Mandy Fulton

We swooned in delight when this lovely bag showed up on our newsfeed one morning. Mandy Fulton won our Caravelle Arcade fabric give away on Facebook this fall and turned it into something amazing. The outside is Jessica in Ivory and Ruby in Pink, and the inside uses Abby in Gray. Thanks for sharing your bag with us, Mandy!. Follow us on Facebook and Instagram, you never know when the next fabric giveaway will be.

gearbag3

My name is Mandy Fulton. I’ve been sewing for about 4 years, and it has developed into a great hobby! I love having a creative outlet, with a useful and beautiful end product. I sew mostly for myself and two young daughters, as well as my friends and family.

I needed a bag with lots of pockets and dividers to hold sewing gear and allow me to transport it to sewing group, the local quilt store, or on road trips. This bag has a place for everything, and zips closed in such a way that the contents stay put while on the go. I love that when unzipped, there is a tray with a lip to keep my stuff from migrating as I work. I use the little zippered dumpling dish to hold buttons. The fabric dish snaps in place and holds my wonder clips perfectly.

The pattern, called the Bionic Gear Bag Notions Tote, is on Craftsy, and won their 2014 pattern design contest.

gearbag

gearbag2

gearbag4

Instagram Inspiration

Hope everyone is enjoying this lovely time of year. We are headed into one of my most favorite times of year. We are so THANKFUL for all you out there who love and share with us what you make with Sis Boom fabric. If you are anywhere close to CT, please come out to our show in December. Lots of handmade goodies, jewelry, clothing and of course the lovely Jennifer herself.

meandleighcreations: Two great creations from the dynamic duo of Me and Leigh Creations out of Australia. First up a whimsical Pom Pom Phone Pouch in Jessica in blue from the Caravelle Arcade line.

insta5

Second up are these lovely pouches to hold diapers and wipes in a new nursery in Daisy also from the Caravelle Arcade line.

insta7

Amanda.green196: lovely lampshade (center) covered in Isabelle from the Good Company line
insta4

searnmum: – we love this elephant quilt block with made with Sis Boom fabric
insta6

pigtailsandpirates:loving this retro dress in Melody from the Good Company
fabric line

insta3

redthreadstudioonline: gorgeous Sis Boom fabric line up redthreadstudios is using for a quilt.

insta2

craftycjaegar: loving this key fob and joyful message in Claudia from Happy Land

insta8

Guest Blogger: Monique Reynolds

Meet talented quilter and Etsy Shop owner, Monique Reynolds from California. Visit her Etsy shop and follow her on Instagram. We adore the bag and quilt she made with the newest Sis Boom fabric line, Nostalgia. Have you seen the fabric line in quilting and fabric stores by you? Give us a shout!

I began sewing as a newly married wife in 1992 to make curtains for my home. I found I loved combining colors and patterns within a room, so I started sewing for each room. When my daughter was born in 1997 I made my first bed quilt for her & drew up my own design for it. Friends and family encouraged me to go into business making quilts & I didn’t think that was possible until I found out about Etsy. I opened my shop in August 2008 with purses & scarves and started getting requests for quilts. I custom made them with the customer’s fabric choices and soon added that option to my shop. I realized I could make something like a quilt with patchwork on one side, minky on the other that was more affordable and added that item to my shop. Having the support of Jennifer Paganelli trusting me to sew from her new fabric lines has helped me tremendously in getting my name out there to others who are in love her fabric as well but don’t want to tackle quilts. Today I have over 1,000 sales and love that I get to sew every day!

blog

blog2

blog3

blog 4

Sis Boom Guest Blogger: Sarah from Piccolo Studio

Meet the talented Sarah from Piccolo Studio. Follow her on Instagram and visit her Etsy Shop. Sarah’s quilt was made with Sis Boom’s newest line, Nostalgia. NOW in stores. Check your local fabric/quilt store for availability.

My studio is on the Fleurieu Peninsula, South of Adelaide in South Australia. It is home to some of the most spectacular beaches, wineries and scenery. I live there with my husband Peter and 3 children Abby, Cooper and Hannah all of whom helped with my beach photos (hence the little fingers and toes you can see peeking out under the quilt).

I have never really considered myself a quilter, more a lover of beautiful fabrics. I strongly believe that everyone in the world should own one fabulous thing that is beautiful, practical and made just for them. Fabric is my medium of choice because I love the tangibility of it, it holds memory and smell and can physically comfort when needed. Quilts eventually became a natural way for me to make beautiful things that fitted in with my beliefs, and I haven’t looked back since my first one over 9 years ago. My work will always be about the fabric first though – no fancy piecing here! I love using simple shapes and basic fussy cutting to make quilts that are beautiful because the fabric is beautiful, not because, I as a quilter, am technically brilliant. I love working with beautiful florals,they remain my first true love and it is why I was so excited to see Nostalgia by Jennifer Paganelli. I have a desire to use fabric and not have it sitting on a shelf to look at although cutting into beautiful ranges can be difficult! I need to know I have exactly the right pattern in mind before I start. I have a real passion for handmade and what it represents for me and my family.

Finally I also have a passion for colour and pattern, life should be as full of it as possible! My favourite part of my job with Piccolo Studio is always the custom orders, and I love working with families to create the perfect nursery or bedding set. My mama throws are becoming more and more popular too which is a joy because it is lovely seeing a mum spoiling herself. I always try to work with classic fabrics that wont limit or date so they can be loved forever.

Now about my Nostalgia quilt – I have used every fabric in the range and I love how it turned out. I used the Fat Quarter Fizz pattern (free to download) by the Fat Quarter Shop and had her long arm quilted by Quilting in the Vines, a business local to me. The backing is a perfect pink damask and I have machine bound in a mint fabric I had in my stash.

Photos were taken by me with the help of my 3 children at our gorgeous local beach, in Port Willunga. It is such a beautiful place and I took the photos about an hour before sunset, in my very last photo you can see the light hitting the water, it is a truly spectacular place to visit.

piccolo5

piccolo3

Piccolo1

piccolo2