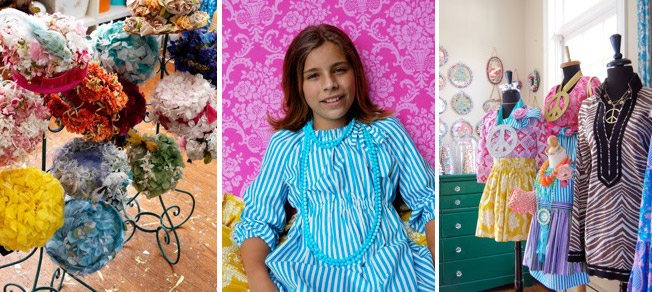
February 8, 2015 by Jennifer Paganelli
Tags: Craft, create, DIY bouquet, DIY party decorations, DIY Wedding, make, make it, Sheet music crafts, sis boom craft, Sis Boom Projects, Valentine Craft, Valentine Tutorial, Valentines Day, vintage Valentines
Categories: Uncategorized •
Comments Off on Valentines Day Bouquet
September 30, 2014 by Jennifer Paganelli
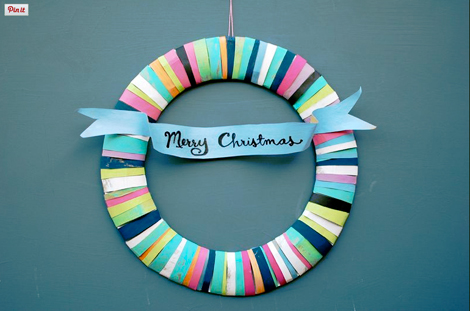
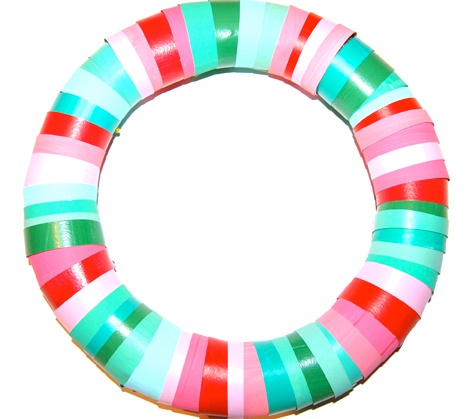
I just love the way that sounded!!!!! Hey I was googling wreathes and look what I found the coolest tutorial by the coolest girl!! Ok so of course I can’t follow directions so I just used acrylics and watercolor paper because that’s what I had in the house! You probably saw my paper paintings on Instagram because FB and Pinterest has brought me to a wonderful place within and that is not to be scared of anything. Paints were definitely out of my comfort zone but painting a sheet of paper was like whoa!! I can do that. Baby steps friends when you are a beginner and let the uglies of being a beginner be ok. So I looked up this blog because this amazing wreath was staring me in the face and I had to know what it was all about. I want to paint paper the restoof my life..going for paperbags next. Hey girlfriend Jessica..how about a challenge sprinkle your confetti on painted strips and create a wreath!! I hope she’s listening..she’s got cool ideas!! So anyway here it is ..Giddy Giddy and then me!! She did it with cardboard and I did it with Styrofoam. Hey whatever you do it’s all about the fun!!
Tags: Craft, DIY, make it, paper wreathes
Categories: Uncategorized •
1 Comment »
September 17, 2014 by Lisa Bernstein
That chill in the air could only mean one thing…The Sis Boom Holiday Sale is around the corner!
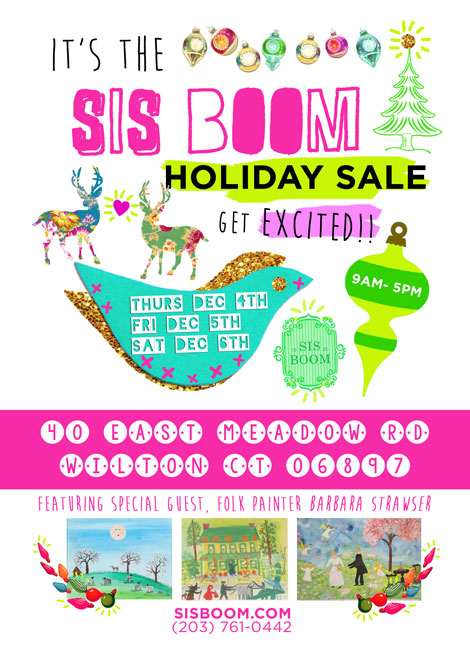
Wahoo!! Get excited because this year’s annual event will take place on December 4th, 5th and 6th! The sale, located at the address above in Wilton, CT, will feature many handmade items crafted by Jennifer herself as well as items featuring exclusive Sis Boom designs!
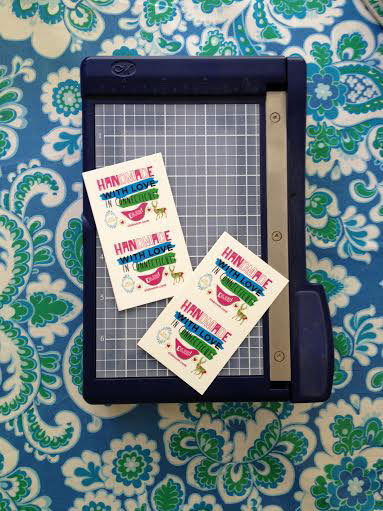
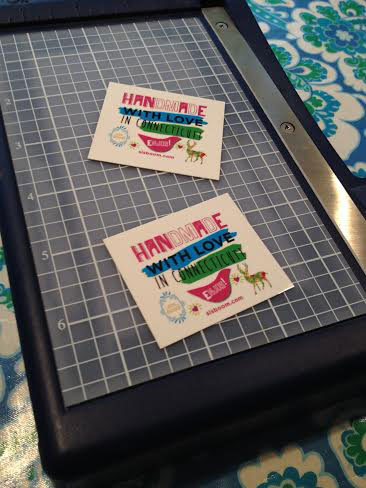
Handmade items will be easy to spot with this adorable tag attached:
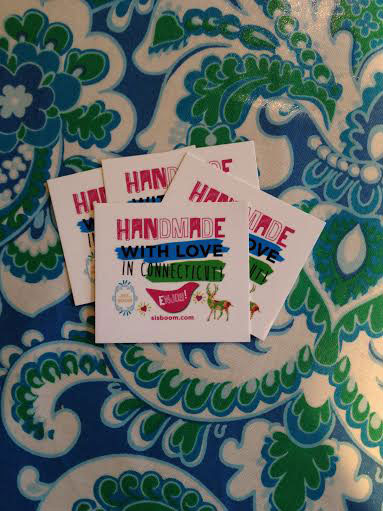
FYI – If there are any business owners out there looking to make tags and save some money, here’s how we did the one above:
Click this link and follow the prompts to create your tag using the business card template. Scroll to the bottom and upload your artwork by clicking on “Use Your Complete Design.” Design the artwork for your tag using Photoshop or Illustrator. After the upload process is complete, expect to cut and punch holes in your card.
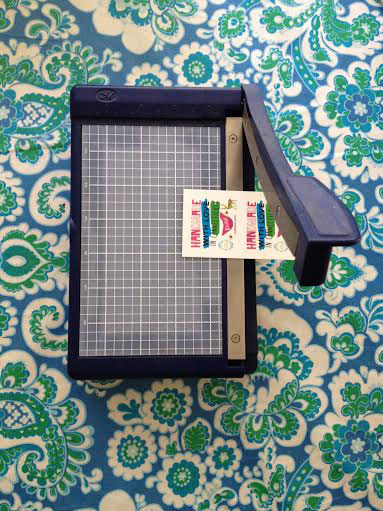
Here is how we cut ours:
We are so excited about this year’s show and can’t wait to see you there!!
—
Lisa
Tags: Craft, Glitter, Holiday, Holiday Gifts, Holiday Show, Holiday Show Wilton, jennifer paganelli, Quilting, Sis Boom, Sis Boom Holiday, Sis Boom Sale, Vintage
Categories: accent pillows, accessories, Big Events, Christmas, Christmas Trees, Collage, Color, Colorful Quilting, Craft, crafting, crafting classes, Creativity, Decoupage, designer cottons, easy sew, embroidered pillows, flower bouquet, garland, gifts, glitter, hand sewing, handbags, Happenings, Holiday Show, Holiday Show in CT., Home Dec product, Items for sale, Lisa, ornaments, Paint, patchwork, Patterns, pillows, pom poms, Quilt squares, Quilter Friendly, Quilters Quilts, Quilting, quilting cottons, room decor, sequins, sewing, Sis Boom, Sis Boom Crafts, Sis Boom Fabric, Sis Boom Fabric Designs, Sis Boom in the world, Sis Boom Special Event, Sis Boom Style, Stationary, Style Maven, tinsel, tulle, Vintage Christmas, Vintage Holiday •
Comments Off on Holiday Show
September 14, 2014 by Lisa Bernstein
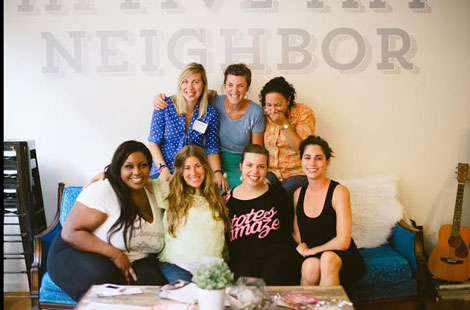
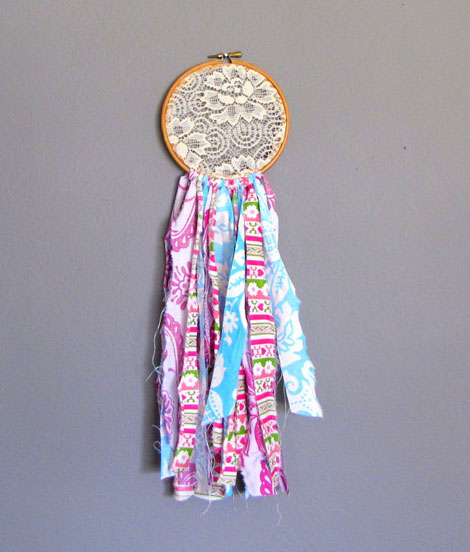
This past weekend I had the luxury of attending Monarch Workshop. The workshop is run by an incredible group of women (including our very own Madeline) and aims to support “those who need a little push, those who are looking for a creative connection, and those who need inspiration to believe they can follow their dreams.”
The attendees were made up of a spectacular group of women whose occupations ranged from bloggers to therapists and real estate agents to artists. The two day workshop consisted of non-stop activities (lessons, speakers, crafting) that catered to the mind, body and soul. It was FABULOUS.
Our fearless leader, Jennifer Paganelli, was a guest speaker and led the group in creating vision books. The books were created by gluing inspiring cut outs (words, quotes, images) from magazines onto blank notebook pages.

There was yoga and lessons in make-up and skincare. We made our own dream catchers, ate delicious food (from the ladies at Whisk + Brush) and had a tutorial in all things confetti! Take a look below of more images from the incredibly talented Victoria Gloria:

To see even more images click here
For information on Monarch Workshop and to receive notifications about the upcoming Spring 2015 Workshop click here
—
Lisa
Tags: Craft, DIY, Inspiration, jennifer paganelli, Madeline, Monarch Workshop, Quilting, sewing, Sis Boom Fabrics
Categories: Big Events, class time, Color, Colorful Quilting, Craft, crafting, crafting classes, Creativity, easy sew, Fabric, glitter, Inspiration, Inspire Me!, journals, Lisa, Love, Make my day!, Monarch Workshop, Paint, Quilter Friendly, Quilters Quilts, Quilting, Quilting Collage, ruffles, sewing, Sis Boom, Sis Boom Crafts, Sis Boom in the world, Sis Boom Special Event, Things to be grateful for, Tutorial, Uncategorized, workshop, You Can Make This •
1 Comment »
September 5, 2014 by Lisa Bernstein
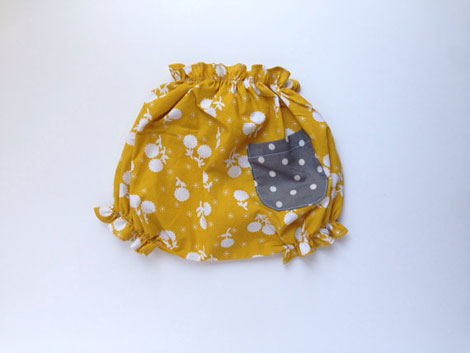
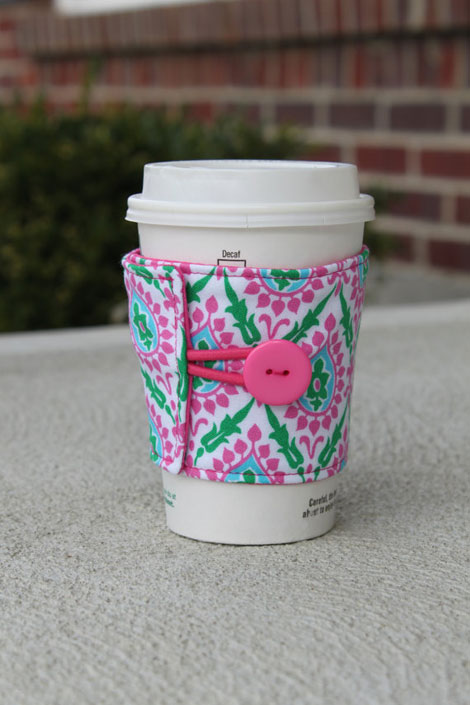
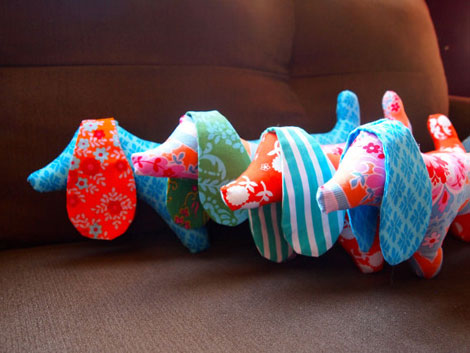
Ooooh baby! Something very special is happening around our offices these days… Jennifer’s right hand gal, Madeline, is pregnant! Yaaaaayy to Madeline and her hubby, Jordan!! Thanks to my fellow Sis Boom admirers (i’m talking about YOU!) and a one stop shop at Etsy, Madeline can spend her entire maternity surrounded by all things Sis Boom!
Need some bloomers? MaggieBogart has you covered:
Rattles? LoneCedarStudio saves the day:
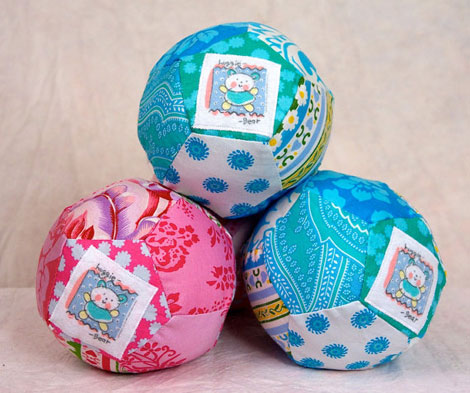
Mama needs a coffee break? Protect your fingers thanks to ckstitches:
Ensure sweet dreams for your little one thanks to bailybelle:
Zurelli knows that no nursery is complete without some plush animal friends:
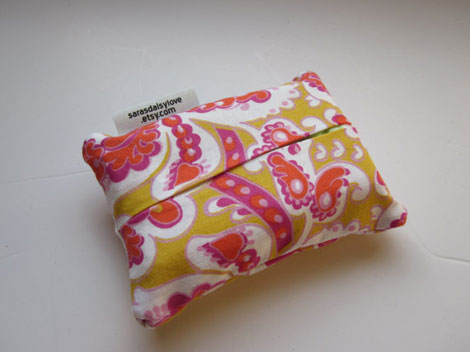
And finally, for when you’re overwhelmed with joy, love, and happiness towards the perfect little human you’ve created, reach for those tissues in style with help from SarasDaisyLove:
CONGRATULATIONS MADELINE AND JORDAN! WE LOVE YOU!
—
Lisa
P.S. Madeline will be posting a big nursery reveal in the coming weeks on her blog, Oh My Gemini!! Make sure to check it out!
Tags: Baby, cotton, Craft, Fabric, jennifer paganelli, made by you, Madeline, nursery, Quilting, room decor, Sis Boom, Sis Boom Fabrics
Categories: baby room, boys, Colorful Quilting, designer cottons, easy sew, ETSY, Fabric, gifts, Items for sale, Lisa, Love, Made By You!, Patterns, Quilter Friendly, Quilters Quilts, Quilting, quilting cottons, redecorate, room decor, sewing, Sewing lessons, Sewing tutorials, Sis Boom, Sis Boom Fabric, Sis Boom in the world, Sis Boom Room, Style Maven, Things to be grateful for, Uncategorized, You Can Make This •
Comments Off on Sis Boom, Baby!
July 22, 2014 by Jennifer Paganelli
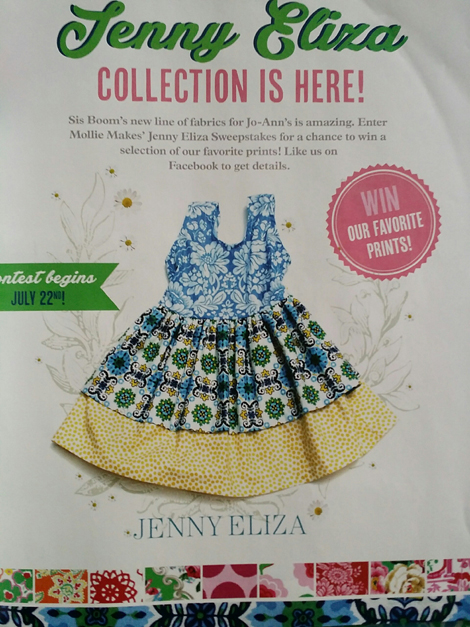
Yup you heard right and we love the editor Katherine Stevenson so much….She’s doing it all right now and boy is she bringing it. Props for the All Star Girl. Lets just say a delight to work with and totally on her game. The 4th issue of Mollie Makes is dynamite (ok so maybe we are in it) but even if we weren’t you would go CRay CRay!! Packed with unbelievable crafts and totally upscale it is the go to CRaft Magazine of our time. Yes I said it… So stop what you are doing and go get you a copy……and enter the contest..yes starting today!!! #jennyeliza #jenniferPaganelli oh and follow JennyEliza on Facebook 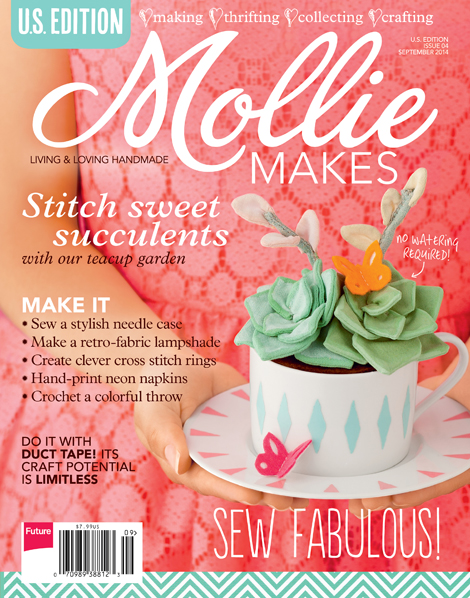
Tags: Craft, create, DIY, Jennifer Paganelli Home, Mollie Makes USA
Categories: applique, baby room, Beach, Beauty Queen, Books, canopy, Cathy Pattern, Collage, Colorful Quilting, Craft, craft trees with vintage wallpaper, crafting, crafting classes, Crazy Love, designer cottons, Digital downloads, DIY, downloadable Patterns PDF, dress fabric, Dress Patterns, Easy project, easy sew, electronic pattern, ETSY, Fabric, facebook, fat quarters, floral fabric, Fons and Porter, Freespirit, garland, garlands, girls dresses., Girls Sewing!!, Girls World, Girls World Vibe, hand sewing, Handmade in America, Happy Home, Happy Land, Hearts, Home Dec product, hook pillows, Jamie Dress PDF, Jenny Eliza, JoAnns, JoAnns Fabrics and crafts, Josie Dress, Mollie Makes, old wallpaper, Paint, patchwork, PDF downloadable pattern, pillows, Pink Fabric, quilted handbag, Quilter Friendly, Quilters Quilts, Quilting, quilting cottons, quilting fabric westminster, quilting stores, sewing, Sewing lessons, Sewing tutorials, Sis Boom patchwork, Sis Boom Pattern Co., Sis Boom Patterns, Sis Boom Room •
Comments Off on Mollie Makes USA
June 4, 2014 by Jennifer Paganelli
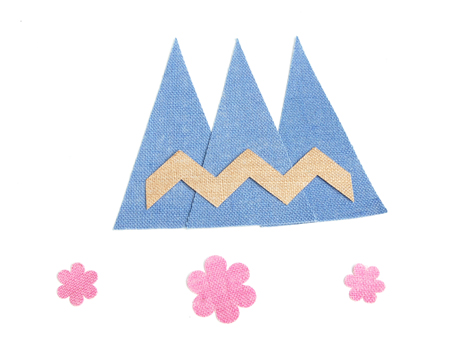
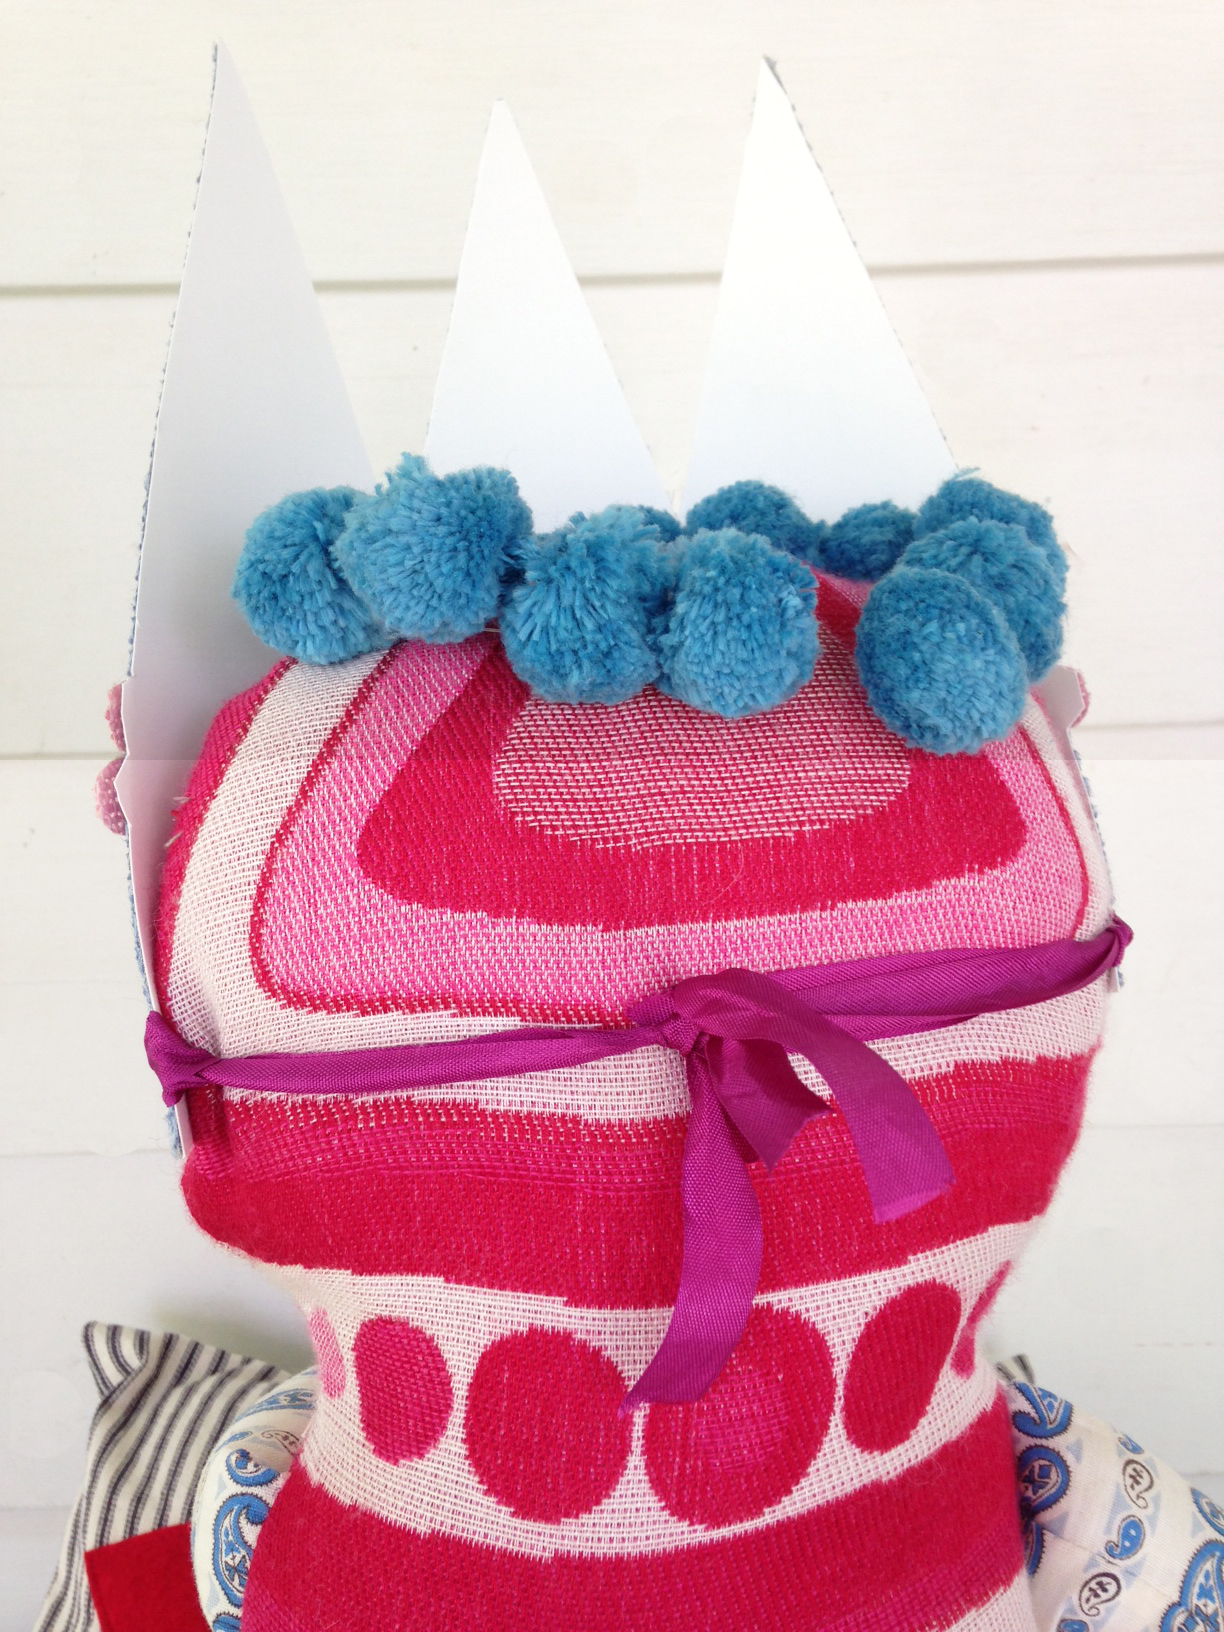
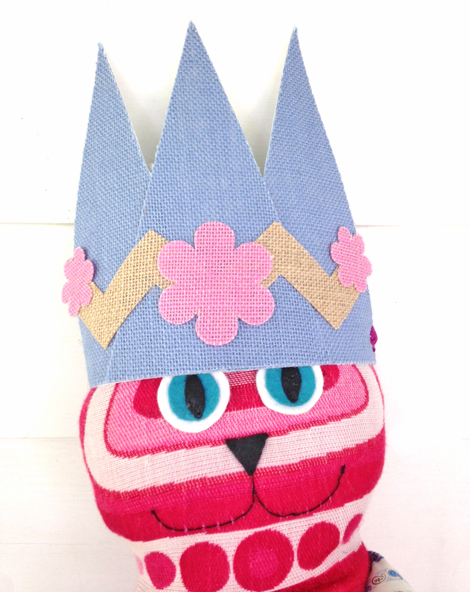
Make a sweet burlap crown in just a few steps!
This burlap is adhesive, so leave your glue behind…
All of these crafty products are by Springs Creative for Walmart.
They’re all available in Walmart stores, and some are even available online!
All you’ll need to make this crown is:
- 3 triangles
- one chevron
- 1 large flower
- 2 small flowers
- hole punch
- seam binding ribbon
- flexible poster board
SUPPLIES:
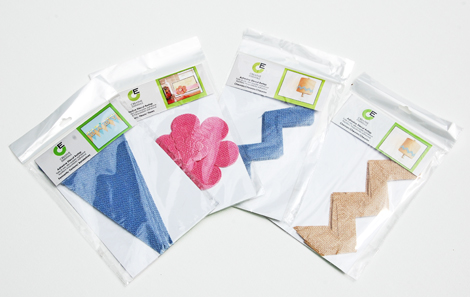
WHAT YOU’LL GET!
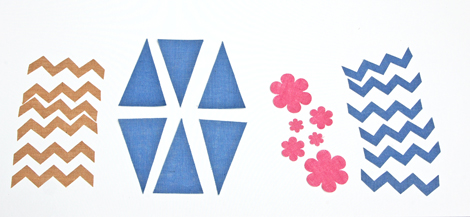
WHAT YOU NEED FOR THE CROWN: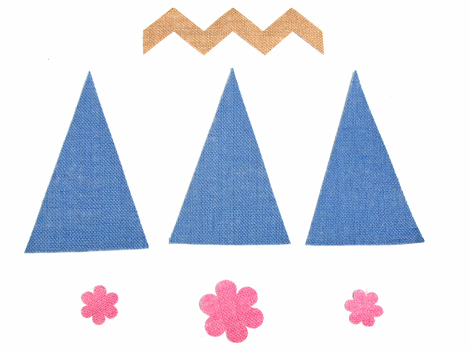
STEP 1:
Peel backing off of burlap and arrange trinagle pieces on a piece of flexible poster board
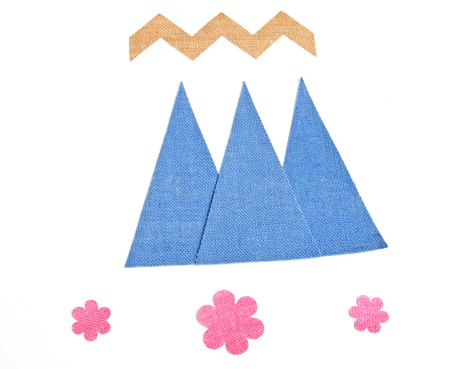
STEP 2:
Peel backing and adhere chevron to triangles
STEP 3:
Peel backing off of flowers and adhere to chevron and triangles
Cut out the crown shape from your piece of poster board
Punch holes on either side of the crown
Pass some pretty seam binding ribbon through the holes … and viola!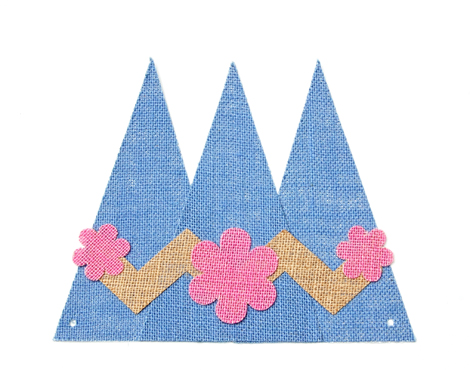
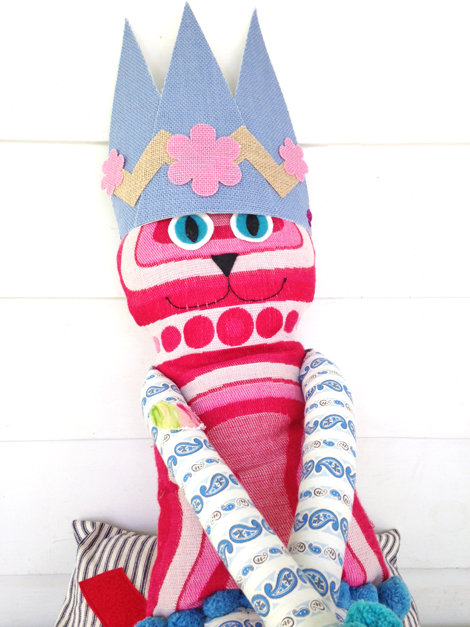
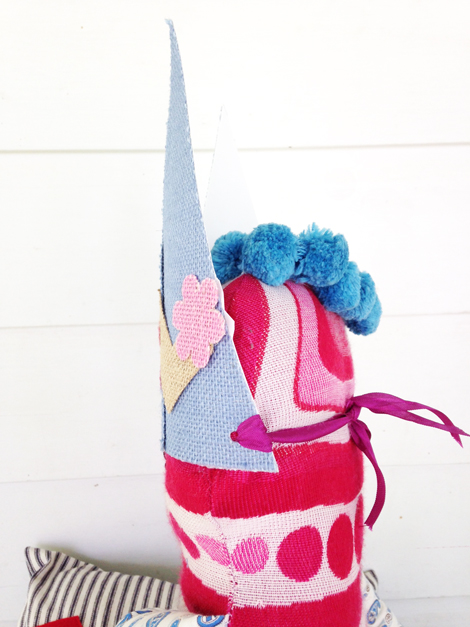
VIOLA! A sweet little crown for our vintage friend sporting vintage fabric!
Tags: Adhesive, Burlap, Craft, Crown, DIY, Springs Creative
Categories: Burlap, Craft, DIY •
Comments Off on DIY Crown with Creative Essentials Adhesive Burlap Cut Outs
January 15, 2014 by Jennifer Paganelli
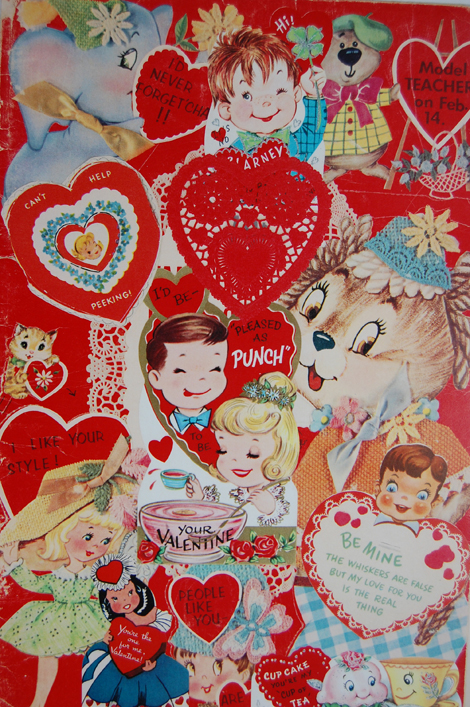
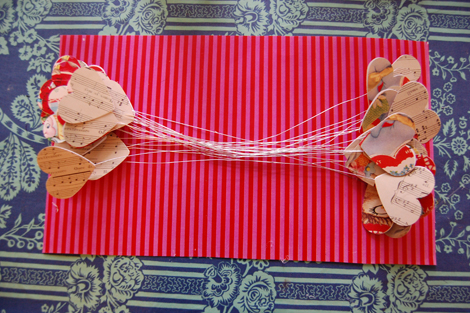
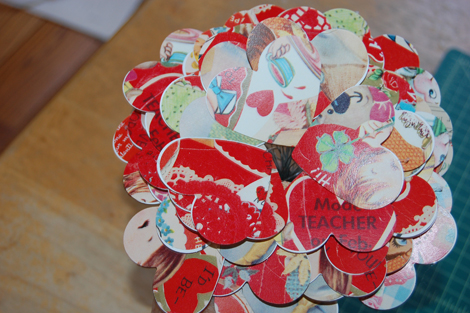
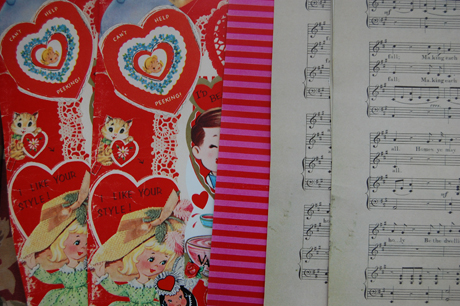
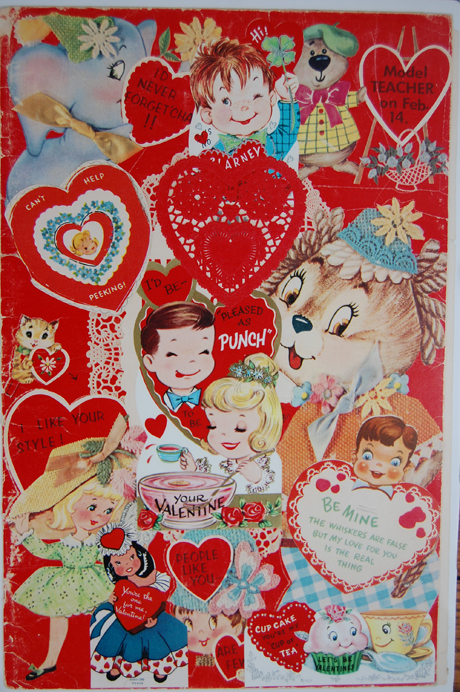
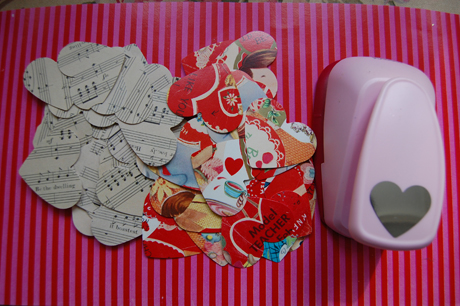
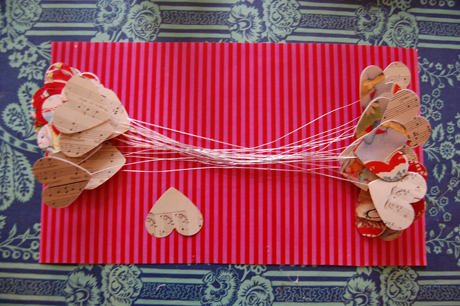
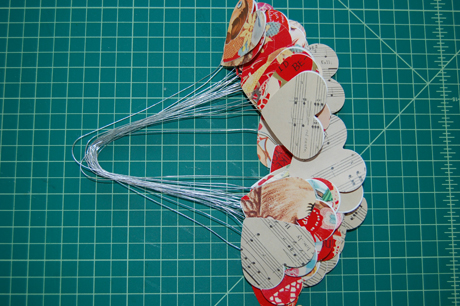
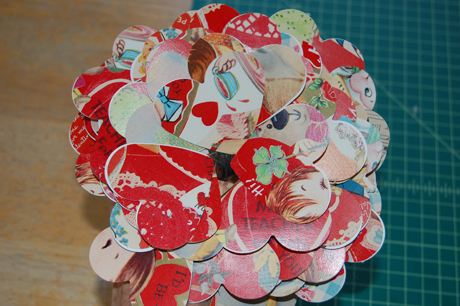
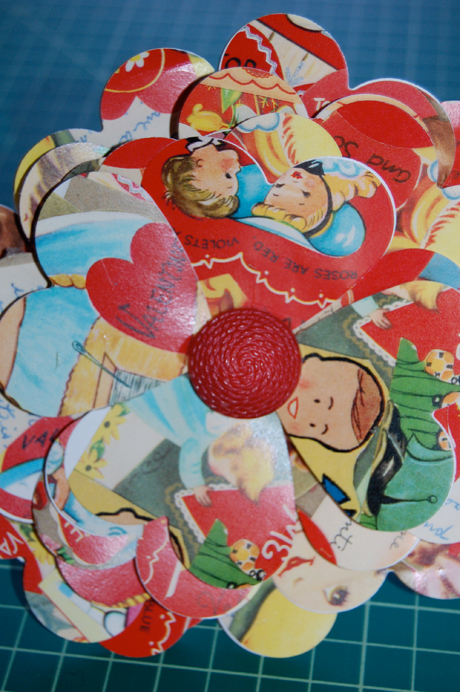
Get ready for a photo tutorial of the Valentines Bouquet you all loved. Get some valentine scrapbook paper, maybe some sheet music, some stripes if you want and you will need 18-20 gauge wire so you can glue both ends with hearts. Cut out 40 hearts and 40 backs to those hearts. Place hearts on either end of 12″ wire stem put scrapbook paper and sheet music back to back and sandwich in the wire. Use a 2″ punch for best results! See supplies below, very easy project.
Picking up where we left off..
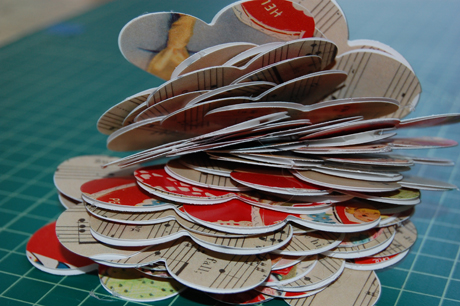
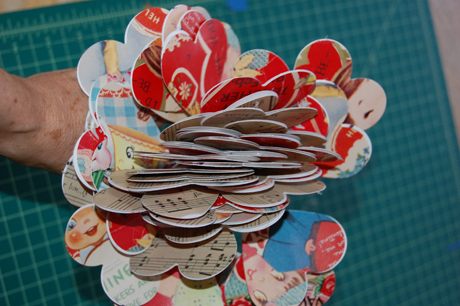
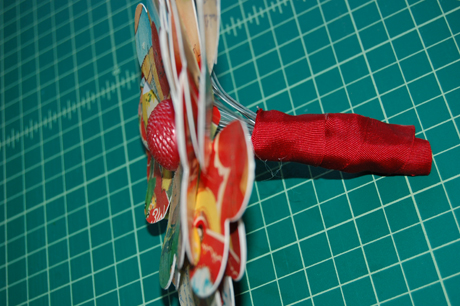
Okay so you have your hearts on wires now so fold the bunch in half, close hand around gently..bend back the hearts and flip the music sheet to the back or whatever you like the sheet music can be on top( they are on wire so whatever you choose will be on the top…press them outward (that’s why we use wire 20 gauge) then when they are all out hold with a rather firm grip and spread them to make a bouquet, so they progressively go out. , wrap ribbon around the wire once you have determined your bouquet is where you like it..use hot glue and wrap ribbon around the stem to the top..seal with hot glue..then in the middle of the bouquet put hot glue and add a button or some other vintage castoff or an old jewel..and voila Give it to the one you love!!!! Please let me know how you did.
Tags: Bouquet, Craft, heart punch, Hearts, Tutorial, Valentines
Categories: Craft, crafting, crafting classes, Craftsy, Decoupage, Easy project, Tutorial, Valentine, Valentine Love, Valentines tutorial, vintage •
2 Comments »
December 10, 2013 by Madeline Rhodes
Get your contest hat on!… Share your garland on the Sis Boom facebook page for a chance to win 2 yards of fabric.
By sharing your photo with us, you’re automatically entered to win the contest. Most creative banner gets the prize — winner announced on Tuesday 12/17!
Itching to make something crafty, simple and fun for your home? Don’t have time to run out and shop for all of the pieces?! Well, then, you’re totally in luck.
All you’ve gotta do is download this nifty PDF (either by clicking here, or on the images below), cut out the shapes, string them together and VIOLA!
It’s seriously simple:
- click on the image below to download the PDF file. (It will download to your downloads folder)
- open and print pages on card stock or glossy photo paper for that extra oomph
- cut out banner pieces – either “free cut”, use a 2 1/8″ circle punch, or a flower punch if you have one! We love all shapes!
- assemble to your heart’s desire either by gluing circles back to back with yarn or bakery twine in-between using a hot glue gun (supervised by an adult), OR punch small holes on outer edges of circles and knot the bakery twine to each circle, ultimately connecting them all in a pretty pattern!
Hang this sweet garland in a doorway, above a mantel, in your window, or even gift it to that special someone.
HAVE FUN!
Peep Jen’s Garlands! She used a flower punch, ribbon and yarn, making 2 separate garlands:
CLICK ON ME TO DOWNLOAD
Tags: Christmas, Craft, decor, DIY, download, free download, Holiday, jennifer paganelli, Sis Boom, Sis Boom garland, Tutorial
Categories: contest! •
Comments Off on Free Garland Download CONTEST!
October 31, 2013 by Madeline Rhodes
Tags: Craft, CT, DIY, Holiday, holiday decor, Holiday Shopping, jennifer paganelli, Sis Boom, Sis Boom Holiday Show, Wilton
Categories: Sis Boom •
Comments Off on Sis Boom Magic