September 17, 2014 by Lisa Bernstein
That chill in the air could only mean one thing…The Sis Boom Holiday Sale is around the corner!
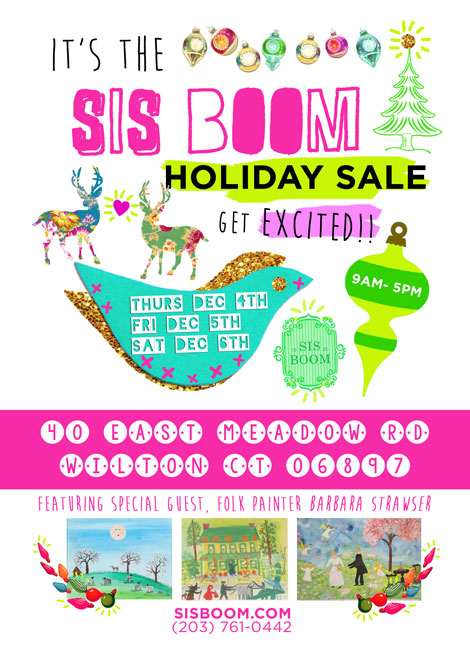
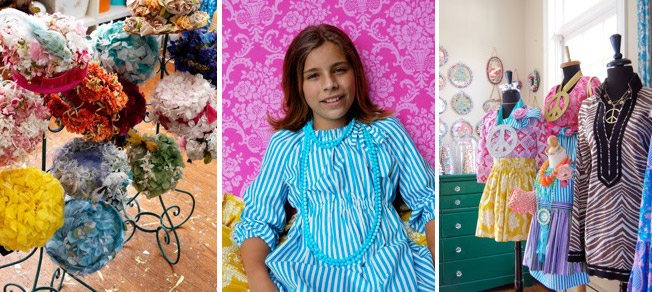
Wahoo!! Get excited because this year’s annual event will take place on December 4th, 5th and 6th! The sale, located at the address above in Wilton, CT, will feature many handmade items crafted by Jennifer herself as well as items featuring exclusive Sis Boom designs!
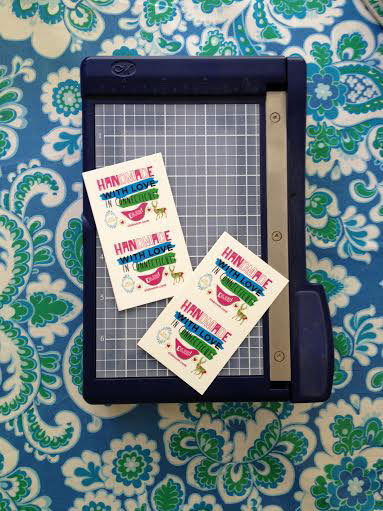
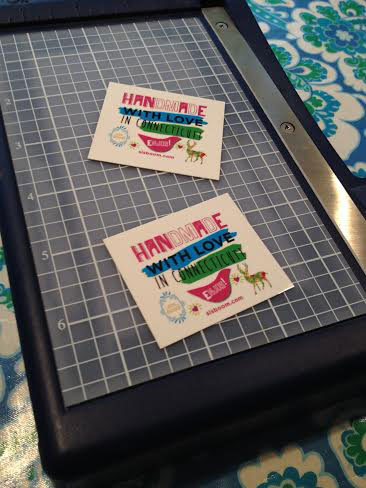
Handmade items will be easy to spot with this adorable tag attached:
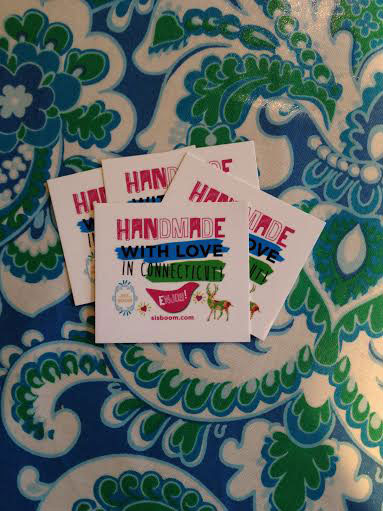
FYI – If there are any business owners out there looking to make tags and save some money, here’s how we did the one above:
Click this link and follow the prompts to create your tag using the business card template. Scroll to the bottom and upload your artwork by clicking on “Use Your Complete Design.” Design the artwork for your tag using Photoshop or Illustrator. After the upload process is complete, expect to cut and punch holes in your card.
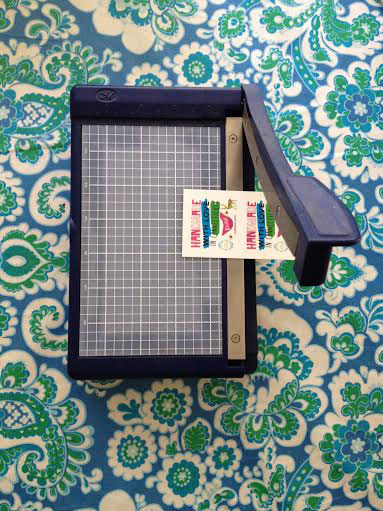
Here is how we cut ours:
We are so excited about this year’s show and can’t wait to see you there!!
—
Lisa
Tags: Craft, Glitter, Holiday, Holiday Gifts, Holiday Show, Holiday Show Wilton, jennifer paganelli, Quilting, Sis Boom, Sis Boom Holiday, Sis Boom Sale, Vintage
Categories: accent pillows, accessories, Big Events, Christmas, Christmas Trees, Collage, Color, Colorful Quilting, Craft, crafting, crafting classes, Creativity, Decoupage, designer cottons, easy sew, embroidered pillows, flower bouquet, garland, gifts, glitter, hand sewing, handbags, Happenings, Holiday Show, Holiday Show in CT., Home Dec product, Items for sale, Lisa, ornaments, Paint, patchwork, Patterns, pillows, pom poms, Quilt squares, Quilter Friendly, Quilters Quilts, Quilting, quilting cottons, room decor, sequins, sewing, Sis Boom, Sis Boom Crafts, Sis Boom Fabric, Sis Boom Fabric Designs, Sis Boom in the world, Sis Boom Special Event, Sis Boom Style, Stationary, Style Maven, tinsel, tulle, Vintage Christmas, Vintage Holiday •
Comments Off on Holiday Show
August 30, 2014 by Lisa Bernstein
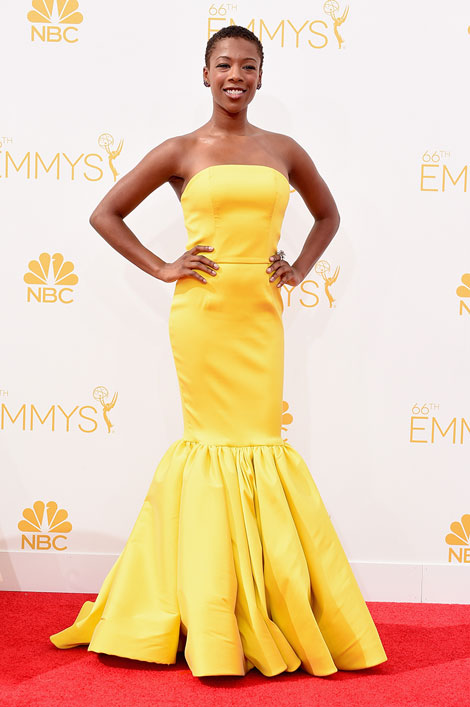
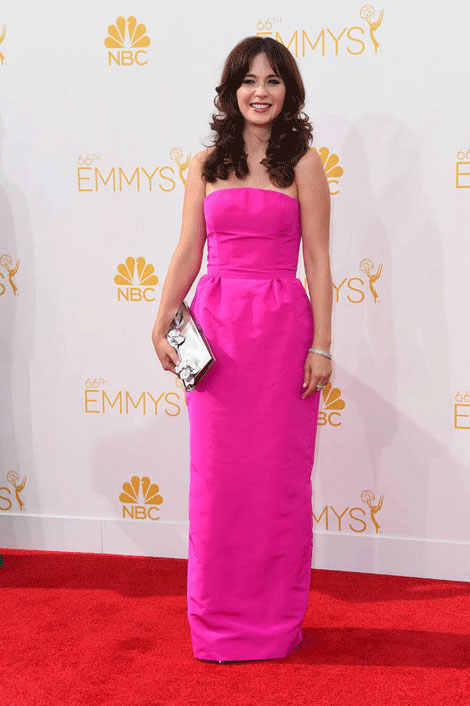
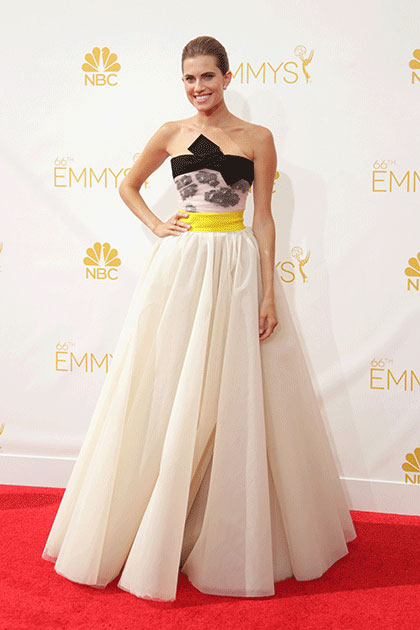
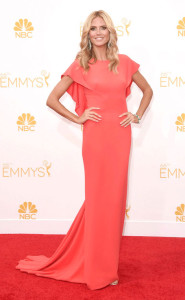
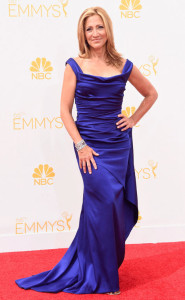
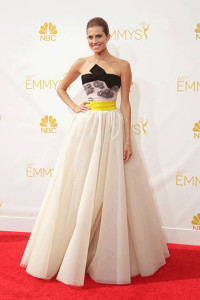
If you don’t already know, the bold, vibrant, joyful and stunning colors used in all of Jennifer’s lines are a tribute to her time growing up in the Caribbean. That’s right, Jennifer grew up in St. Croix! How cool is that?! Bold colors are popping up all over the place these days and we want to share with you some of our favorites! Here is our first installment of a new series called Caribbean Colors! Today our focus will be the 2014 Emmy Awards! Here are our winners for Best Dressed in Caribbean Colors on a Red Carpet:
Samira Wiley in Christian Siriano:

Julia Louis-Dreyfus in Carolina Herrera:

Heidi Klum in Zac Posen:
Edie Falco in Escada:
Zooey Deschanel in Oscar de la Renta:
 And finally, a special mention goes to Allison Williams in Giambattista Valli Couture (who along with Heidi Klum was my personal best dressed star) for Best Pop of A Caribbean Color:
—
Lisa
Tags: Colors, cotton, Glitter, jennifer paganelli, patterns, Quilting, Sis Boom, Style
Categories: Award Winning, Caribbean, Color, designer cottons, dress fabric, Dress Patterns, Fabric, girls dresses., Lisa, Patterns, Quilting, sequins, sewing, Sis Boom, Sis Boom Style, So St. Croix, Solids for apparal, Style Maven •
1 Comment »
March 4, 2014 by Madeline Rhodes
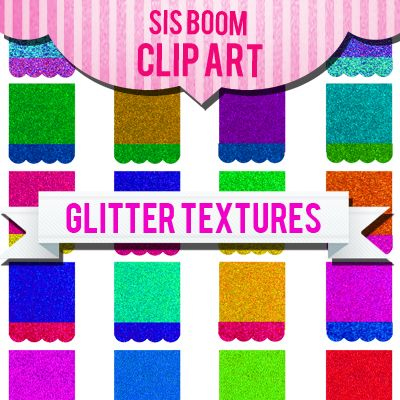
This is the cleanest glitter you’ll ever work with. No glue, no wait time, no glitter stuck on your face (not that that’s a bad thing!)… just print and play!
Oh, and did we mention that it’s a FREE download?!
Consider this Glitter Textures set a gift – we want you to print, cut and have FUN! The pieces are large enough to create a banner, or can be made tiny enough to design little table settings, cupcake flags, or love notes. Let your imagination run wild!
Click HERE or on the image below to download your glitter kit. The zip file will go to your downloads folder. Open it up and get going! Work with the files digitally or print them for some paper fun.
Tags: free, Glitter, PDF download
Categories: Clip Art, Sis Boom •
Comments Off on Glitter at your fingertips
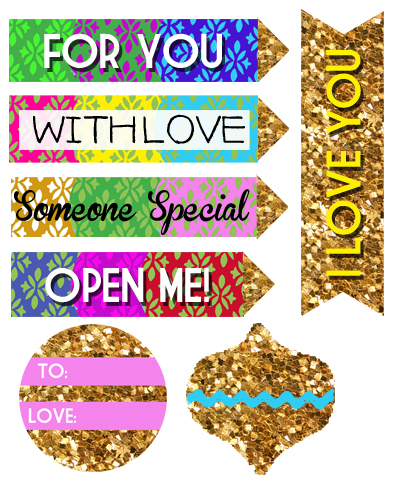
December 11, 2013 by Madeline Rhodes
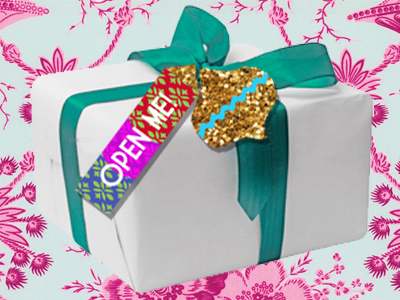
We love adding pep… who doesn’t adore a pop of color, a burst of glittery goodness, an extra touch of KAPOW?!
This year when you give your gifts, we’ve got you covered. Enjoy this free gift label download. Print the PDF (by clicking HERE or on any of the images below), cut, and attach to your gifts! Have fun!
Tags: DIY, gift, gifts, Glitter, Holiday, jennifer paganelli, Sis Boom, wrapping
Categories: Sis Boom •
Comments Off on How to give that gift some PEP!
April 28, 2013 by Madeline Rhodes
Hey everyone! I’ve got a super quick & simple project for today’s Sis Boom Clip Art Series: A Faux Lighted Mirror!

For this project we’ll be using Sis Boom’s Glitter Garland Circles

All you’ll need is this clip art file, some scissors, and adhesive dots.

Start by printing out the clip art onto glossy photo paper and cutting out each circle.

Grab some adhesive dots, adhere to the back of the circles, and start sticking! It’s as easy as that!!


If you want your mirror to have a more “authentic” look of lights, you can choose to just use the gold glitter circles. Line the top of your mirror with the large circles to simulate vanity lights. (You can even line the bottom with the small or large dots if you want!)

Or you can use just pink, or alternate between the two colors. They could also just be used as a decorative border around a mirror – the possibilities are endless!
Tags: Clip Art, Glitter, Jessica Huizenga, Love Colorful, Sis Boom Clip Art
Categories: Clip Art, Love •
1 Comment »
April 5, 2013 by Madeline Rhodes
LOVING our Fridays!!! What a treat to have our girl, Jessica of LOVE COLORFUL all up in hurr on the Sis Boom blog! Take it away, Jessica! Pssssst… Jessica’s beautiful wedding was just featured in Mingle Magazine— you HAVE to check it out. WOWZA!
Hey there! Ok, I know you’ve seen a bunch of trees up on here, but hey, they are just so darn easy and fun to make I can’t help myself! Using Sis Boom Clip Art we’ve already made a Sequin Flower Tree and a Striped Heart Tree, but this week we’re going with a Glitter Scallop Tree!

As you probably have guessed by now, we’re using the Glitter Textures Clip Art (yup! the same ones we used for the Happy Home Banner, except this time we’re using the smaller, original sizes!)
Since we’ve been through this quite a few times, I think we can get by with just a few pictures – sound good? Simply print your clip art on 8 1/2″ x 11″ paper (either plain white paper & glue or you can use sticker backed sheets to help the squares stick to each other)


All you’ll really need is a tiny bit of patience!
Tags: Clover, Craft, DIY, DIY project, Downloadable, Glitter, Jessica Serra Huigenza, Love Colorful, Scallop, Scallop Glitter Squares, Sis Boom Clip Art
Categories: Clip Art, Craft •
Comments Off on SIS BOOM CLIP ART SERIES: GLITTER SCALLOP TREE
February 27, 2013 by Madeline Rhodes
What an exciting day for us here at Sis Boom… Our friend Jessica, over at LOVE COLORFUL, is hopping on board the Sis Boom train to bring you a variety of FABULOUS tutorials featuring Sis Boom CLIP ART, eye candy & inspiration! Get excited, because this is going to be happening once a week around here.. aka, you’ll be so inspired you won’t know where to start! So, friends, let’s put our hands together for Jessica and the LOVE COLORFUL CLIP ART SERIES!!!
Hey, everyone! I am so honored to share with you that Love Colorful & Sis Boom are teaming up to bring you some super awesome, sparkly, happy craft projects!!

Each week I’ll be posting up a colorful new project for you to try using some of the clip art files. From confetti hearts to vintage ephemera, the clip art is already inspiring by itself, but in case you’re in the market for a little more creative inspiration, I’m here to offer up a little guidance (and some glitter!)
The first project will be going up this Friday, March 1st, so be sure to stop by and check it out! Want to get a jump start on the clip art craze? Go here to get yours now! As you can see, they are all so pretty and versatile – and totally affordable when you think of all the mileage we’ll get out of them!
Remember to check back here on Fridays for new clip art projects!
Tags: Clip Art, Clip Art Series, DIY, Glitter, Jessica, Love Colorful
Categories: Clip Art •
1 Comment »
February 15, 2013 by Madeline Rhodes
Hi! It’s Madeline! Ok– I am so over the moon with this new CLIP ART! ahh I can’t stop dreaming up ideas to share with our Sis Boom friends!
As you can see, I made more use of our Valentine CLIP ART.. I’m just thinking of Valentine’s Day as a kick off of LOVE! Why do we only profess our love so openly on this one single day?! Let’s keep it going! Even more surprising than a sweet card on February 14th… is a card afterwards just to say, Hey.. I really (still) love you a lot. It’s like a little non-Valentine’s day surprise.

What else can you do with these Clip Art goodies?
- Print on fabric paper (check Amazon for this) & make pillows! Embellish with sequins & more!
- Print on iron transfer paper (check Amazon for this) and embellish an apron, T-shirt, pillow & more!
- banners, cards, cake & cupcake toppers, garlands, announcements & invitations
- paper chains
- collages
- photograph embellishments
- the list goes on! send us your ideas!
Tags: Clip Art, Glitter, Scallop, Valentine
Categories: Clip Art •
Comments Off on MORE clip art
February 14, 2013 by Madeline Rhodes
Hi everyone- It’s Madeline here to wish you a very happy Valentine’s day!!! Did you shoot out of bed this morning only to realize, “OMG it’s Valentine’s day and I didn’t get my hunnie a single thing!!” Don’t worry! We’ve got you covered! Why don’t you make a sweet card, little banner, touching love note.. something small and special that just says, I LOVE YOU. Don’t stop there!… Send sweet notes to your friends too… broadcast your gratefulness for LOVE on this LOVELY day!
Some ideas for you:
Download Sweet Valentine Ephemera: Print on card stock OR glossy photo paper. Punch out 1″ circles with your paper punch, space circles every 5″ or so, and hot glue circles back to back with a piece of bakery twine between. Swag this sweetness in the doorway and wait for the smiles.
Download Striped Hearts: Print on glossy paper and cut around the hearts. Glue back to back with ribbon between the hears and hang vertically. Make 3 or 4 and fill your doorway with striped hearts! LOVE!
Download V-DAY ephemera: Simple print these vintage valentines out and write a sweet poem on the other side. Doesn’t get better than a good ole fashion love note!
This is what I just made for my special love using the new Sis Boom CLIP ART! HAVE FUN!

Tags: cards, Clip Art, gifts, Glitter, Sis Boom Clip Art, Valtentine
Categories: Valentine, Valentine Love •
1 Comment »
February 8, 2013 by Madeline Rhodes
Thank you to EVERYONE for the Sis Boom support and LOVE!
This was a fun raffle and we’re so grateful for each and every comment. They were all moving and beautiful. Our randomly selected, and oh-s0-lucky winner is KERRY! We’ll be having another raffle soon so stay tuned, friends!!!!

P.S. if you want to make your own valentine wreath- go for it!! It’s easy and involves glitter– what could be better?! Find an embroidery hoop, or something with a similar shape, punch out some hearts from your fave paper pattern.. and glue them along the embroidery hoop! Add some glitter for pizazz, and, of course, a big bow!
Have FUN & let the glitter fly!
Tags: circa, Contest, Glitter, Hearts, kerry, Raffle, winner, wreath
Categories: contest!, Uncategorized, Valentine, Valentine Love •
Comments Off on And the winner is….