November 23, 2015 by Jennifer Paganelli
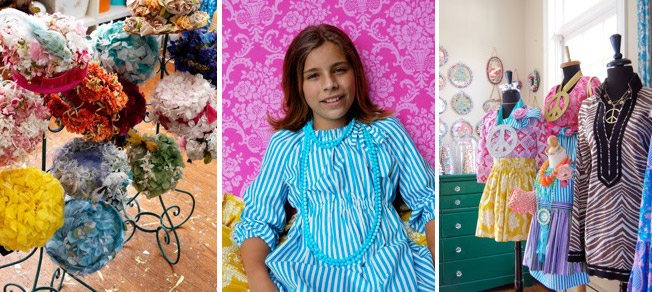
We are truly lucky to have the uber talented Tamara Harrison show us how she creates her AMAZING fabric flowers. Tamara lives in Western Australia and combines her love of jewelry making, millinery techniques, and floristry skills into a stunning wedding business. We fell in love with her flowers when they showed up on our Instagram feed and she graciously agreed to do a guest blog post.
Be sure to visit Tamara at:
www.tamaraharrison.com.au
Instagram
Facebook
When people ask me what I do, I usually say, ‘I make pretty things’, this is often met with ‘what do you mean, what kind of pretty things?’, so I show them my website or Instagram feed and get an ‘OOhhhh, OOooooo, Ahhh I seeeee’. I have to admit, I LOVE this response because of the joy and curiosity it brings.
Arriving here at the ‘I make pretty things’ place has been a culmination of being trained in Floristry & Art, owning floral design shops, making hundreds of wedding bouquets, lecturing in the subject, coming in and out of the creative terror zone and combining all those skills with new ones to make amazing things for events and home.
I am inspired by all things around me and I constantly have to ‘get the creativity out’ otherwise I go a bit batty (It’s true!).
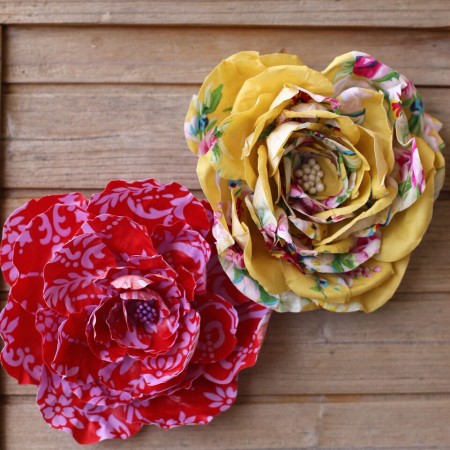
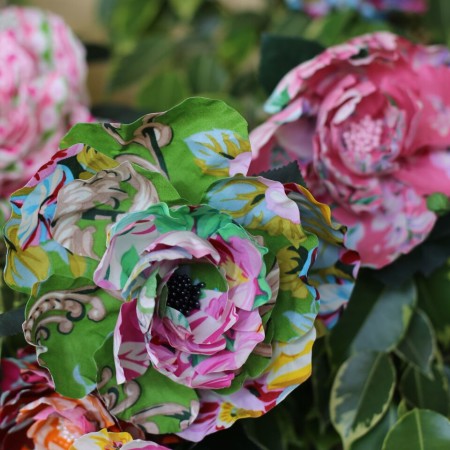
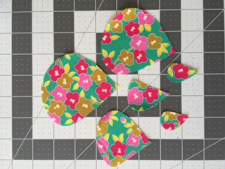
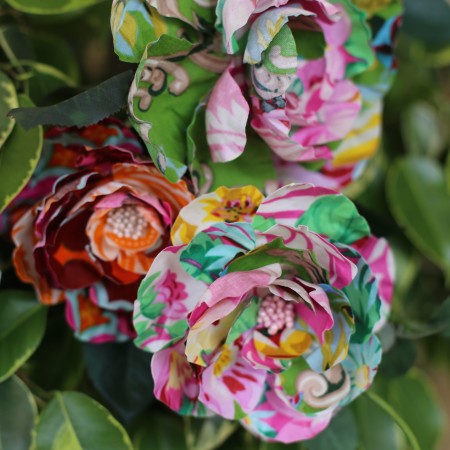
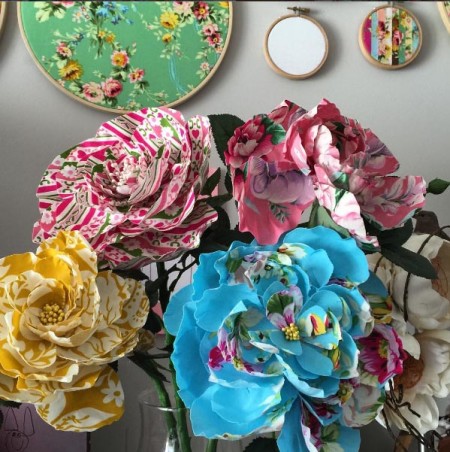
My latest ‘pretty thing’ has been to use my french flower making skills to design fabric flowers. I have become quite obsessed with making them and how beautiful they look in Sis Boom fabric.
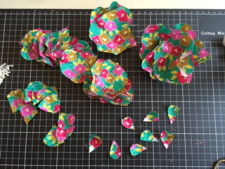
Here are some stages of construction. Each flower takes several hours to complete.
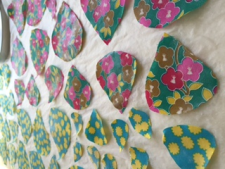
Images 1 & 2: Cut out your petal shape in 5 or 6 sizes small through to large. I cut approx 8 in each size (I may not use them all in 1 flower).
_

_
_
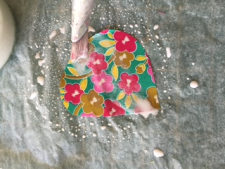
Images 3 & 4: Paint with a fabric stiffener and allow to dry completely. I use my own special formula but watered down craft glue works really well (as long as it dries clear).
_
_
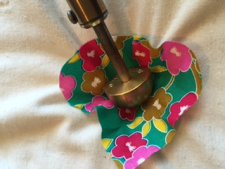
Images 6& 7: Using hot brass flower making tools stretch and shape each petal until it looks three dimensional.
_
_
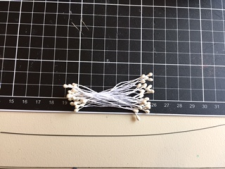
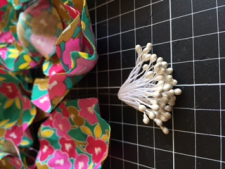
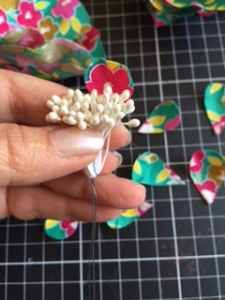
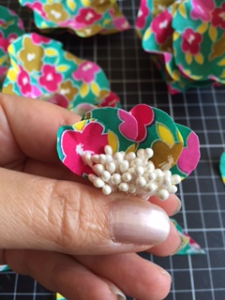
Images 8, 9 & 10: Take a small handful of craft flower stamens and tightly twist a wire through the middle, bending the stamens in half to form a cluster. Sort your petals from smallest to largest. Starting with the smallest petal, take some clear drying craft glue and attach. You can sew your petals on if you prefer.
_
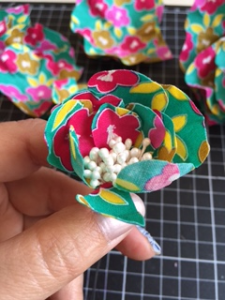
Images 11, 12 & 13: Keep gluing your petals gradually increasing them in size, Make sure to overlap with the previous petal. If in doubt grab a real rose and have a look at how nature arranges them!
_
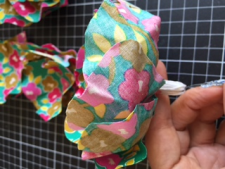
Image 14: Hang completed flower somewhere to dry overnight.

Image 15: Arrange your flower by fluffing up the petals and say WoooHoooo I’ve done it!!
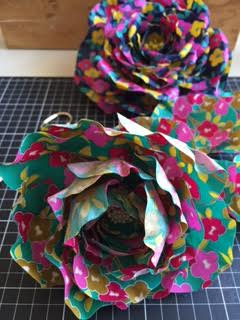
You can then attach a clip, brooch backing or stem depending on how you’d like to use your amazing bloom!
Tags: Flowers, Jenny Eliza, tamara harrison designs
Categories: GUest Blogger •
4 Comments »
February 8, 2015 by Jennifer Paganelli
Tags: Craft, create, DIY bouquet, DIY party decorations, DIY Wedding, make, make it, Sheet music crafts, sis boom craft, Sis Boom Projects, Valentine Craft, Valentine Tutorial, Valentines Day, vintage Valentines
Categories: Uncategorized •
Comments Off on Valentines Day Bouquet
January 15, 2014 by Jennifer Paganelli
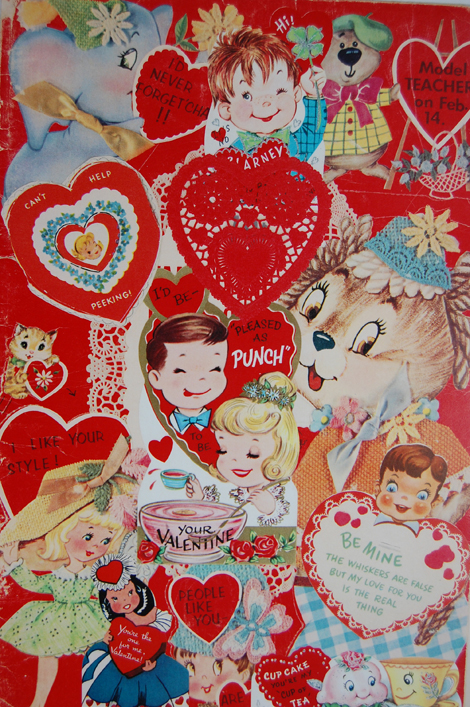
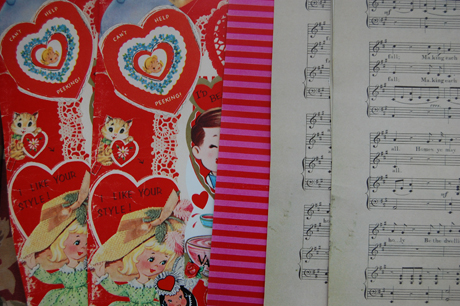
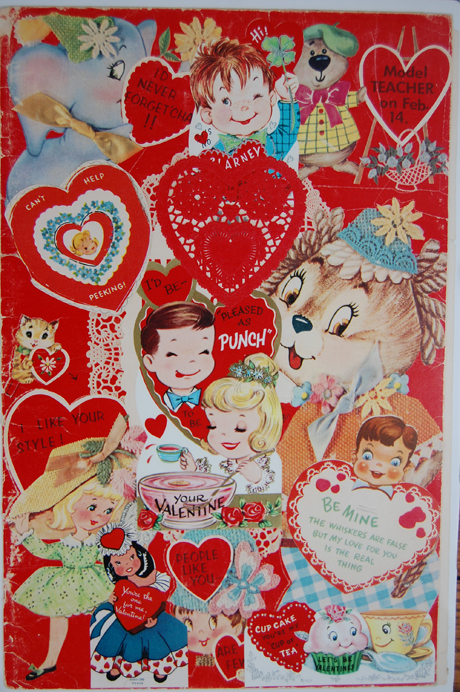
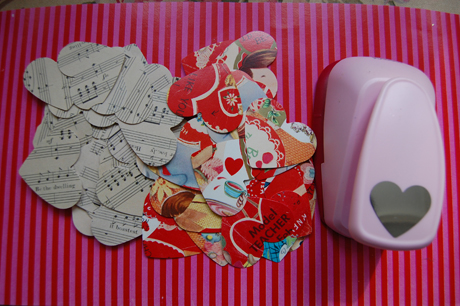
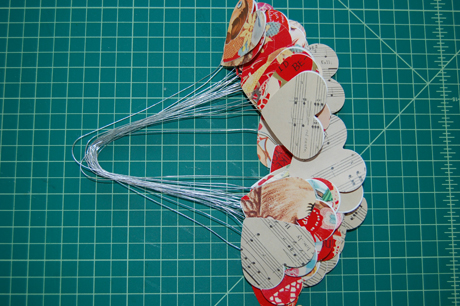
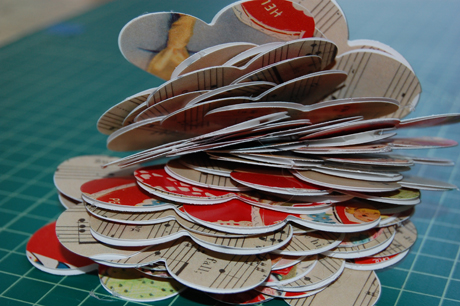
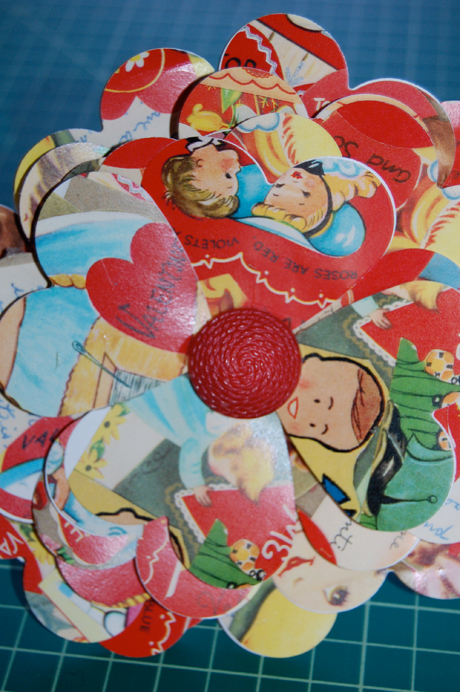
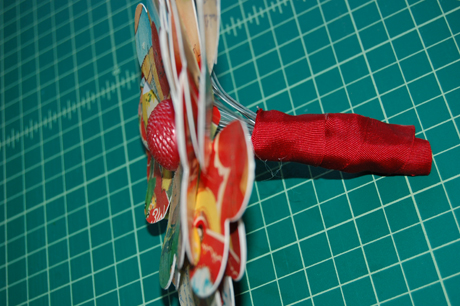
Get ready for a photo tutorial of the Valentines Bouquet you all loved. Get some valentine scrapbook paper, maybe some sheet music, some stripes if you want and you will need 18-20 gauge wire so you can glue both ends with hearts. Cut out 40 hearts and 40 backs to those hearts. Place hearts on either end of 12″ wire stem put scrapbook paper and sheet music back to back and sandwich in the wire. Use a 2″ punch for best results! See supplies below, very easy project.
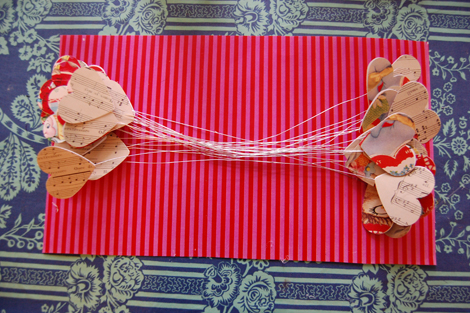
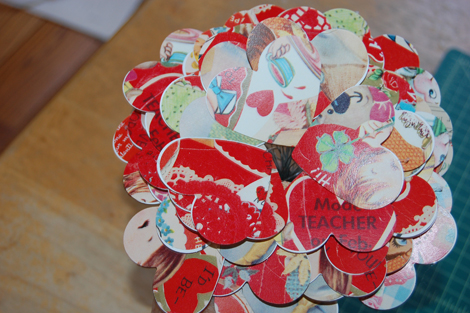
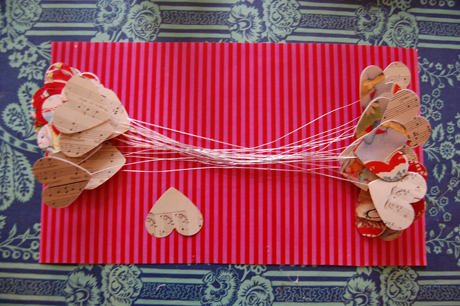
Picking up where we left off..
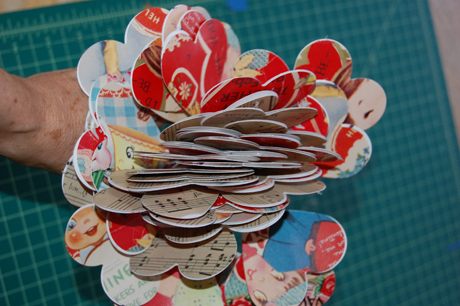
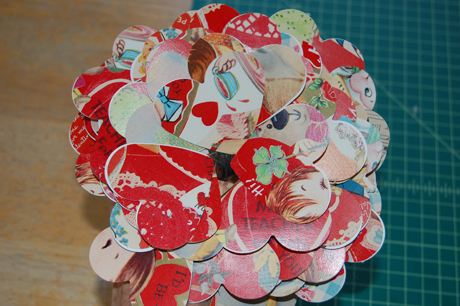
Okay so you have your hearts on wires now so fold the bunch in half, close hand around gently..bend back the hearts and flip the music sheet to the back or whatever you like the sheet music can be on top( they are on wire so whatever you choose will be on the top…press them outward (that’s why we use wire 20 gauge) then when they are all out hold with a rather firm grip and spread them to make a bouquet, so they progressively go out. , wrap ribbon around the wire once you have determined your bouquet is where you like it..use hot glue and wrap ribbon around the stem to the top..seal with hot glue..then in the middle of the bouquet put hot glue and add a button or some other vintage castoff or an old jewel..and voila Give it to the one you love!!!! Please let me know how you did.
Tags: Bouquet, Craft, heart punch, Hearts, Tutorial, Valentines
Categories: Craft, crafting, crafting classes, Craftsy, Decoupage, Easy project, Tutorial, Valentine, Valentine Love, Valentines tutorial, vintage •
2 Comments »
October 16, 2013 by Jennifer Paganelli
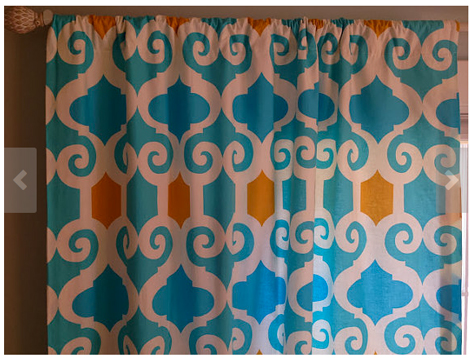
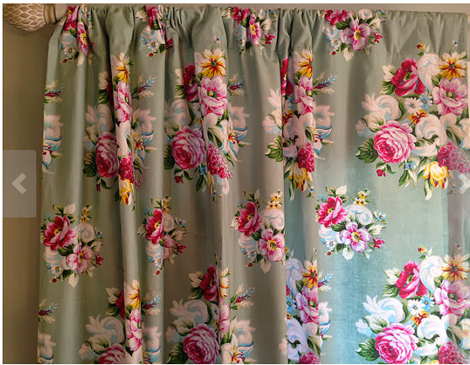
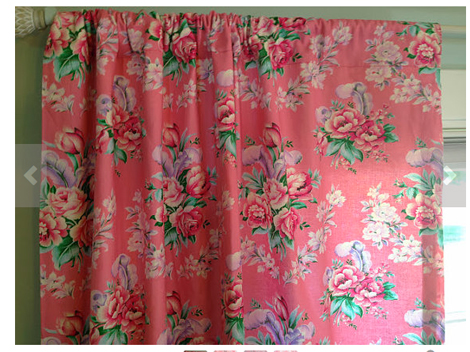
Christy Bennett had an idea a year ago and after lots of consideration she has launched what I deem to be the next best thing from this world. Are you ready??? Pre-made, lined, drapes!!!! I just think this is an idea that will be a huge hit!! I am over the moon excited. Once they find Darling Drapery they’ll just have to deal with which ones to get!!!! So many possibilities and she makes it affordable!!! Christy I think you are on the tipping point of something big and I know it is going to take off!!! throw drapes up and have a party!!!! Match some pillows and you are good to go. Congrats Christy!!So get over to Etsy and take a look at her collection. I know you will love what you see….which room will you tackle first?
Tags: Drapery, florals, graphic prints, premade
Categories: accent pillows, Circa, Lucky Girl, Make my day!, Quilter Friendly, Quilters Quilts, Quilting, Quilting Collage, quilting fabric westminster, quilting stores, Romantic florals, room decor, ruffles, Sis Boom Fabric, Sis Boom Fabric Designs, Sis Boom in the world, Sis Boom Party, stencil, Stitch Craft Create, Studio, West Indies, West Indies Toile, Westminster, whole cloth, wholecloth Quilts •
Comments Off on Fabulous Idea
August 30, 2013 by Madeline Rhodes
Bouquets are beautiful, and fresh flowers are wonderful… but they fade. Why not make your very own felt flower bouquet?! Give it as the most perfect gift, decorate the house with it, carry it down the isle.
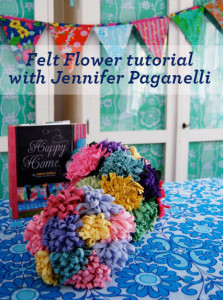
These bouquets can be made quickly and easily with few materials. They’re fun and the finished product is so wonderful. Enjoy, as Jennifer walks you through her Felt Flower tutorial. Have fun, guys! PS, peep ALL of the Sis Boom tutorials HERE>>
Categories: Tutorial •
1 Comment »
August 15, 2013 by Madeline Rhodes
Try and say that 10 times in a row! Ok, don’t.. because it’s impossible 🙂
Enjoy this free, fun, fabulous tutorial with Jennifer. She will walk you through the process of making your very own bouquet from… vintage tissue paper patterns!
HAVE FUN! If you haven’t yet, visit our brand new TUTORIAL PAGE.. Go Crazy!
Tags: Bouquet, crafts, DIY, DIY bouquet, jennifer paganelli, Sis Boom, tissue paper, tissue paper pattern, Tutorial
Categories: Tutorial •
1 Comment »
May 14, 2013 by Jennifer Paganelli
You have to love Violet Fields new pattern. We are crazy about it. The Emmaline dress can be found here. We adore it in Circa and love how the Taylor in blue was just made for little girls, priceless, precious!!!! I just couldn’t wait to show you this photo and have you watch the fabric come to life. An abundance of floral bouquets tells a beautiful story on this little girl. Fabric found here.

Tags: new, patchwork, Quilts, romantic florals, Sew, Vintage
Categories: Australia, baby room, Beach, canopy, Carly Bubble romper, Cathy Pattern, Chandler, Charm necklaces Sis Boom original, charm packs, chunky zebra, Colorful Quilting, Craft, crafting, crafting classes, Crazy Love, Digital downloads, downloadable Patterns PDF, facebook, fat quarters, Freespirit, girls dresses., Girls Sewing!!, hand sewing, honeychild, hook pillows, Items for sale, Josie Dress •
Comments Off on Sweetest little one!!
April 30, 2013 by Madeline Rhodes

Ya’ll are about to get the show of a lifetime.. at the Country Living Fair! On Friday June 7th (4PM) Jennifer will be all up on the Main Stage doin’ her thing, demo-ing mod podged suitcases, crafty fabric bouquets, and sharing Sis Boom tips and tricks! You’ve gotta be there! After her appearance on the Main Stage, Jennifer will be at the Earth Angels tent signing her books, Girl’s World and Happy Home.
Tags: Country Living Fair, Country Living Magazine, DIY bouquets, DIY crafts, DIY suitcases, Earth Angels, Girls World, Happy Home, Mod Podge, Rhinebeck NY, Sis Boom
Categories: crafting, crafting classes, Girls World, Happy Home •
1 Comment »
April 22, 2013 by Jennifer Paganelli
So I had my friend Maritza Bermudez who worked on Happy Home with me create this beautiful canopy just like the one in Happy Home. Once the hardware is up you can take this and change it out. I can’t get over this. All these wonderful bouquets cascading down. I tell you I just will never get enough of Circa and I hope you don’t either. So for a fraction of what designer fabrics would cost you can have the same upscale look!!! Seriously this could cost up to $1000.00 to $1500.00 in Ct. easily!!! DIY this was $160.00 for fabric!! For those of us obsessed with fabric that is a drop in the bucket. Back to back these fabrics are just so perfect together. Please note nothing matches, I love just throwing together what I love!!! When you surround yourself with things you love that is your signature look!! So I hope you like what you see not at all fussy, just impromptu. soon the Circa Pillows will be done and we will show you some whole cloth quilts. Enjoy the photos and of course Mr. George in the middle of it all.


Tags: canopy, Do it yourself, quilting fabrics, simple design, sleeping labradoodle
Categories: accent pillows, accessories, American Patchwork and Quilting Radio, Books, canopy, Circa, Colorful Quilting, DIY, ETSY, facebook, fat quarters, floral fabric, flower bouquet, Freespirit, Happy Home, Quilt Magazines, Quilt squares, Quilting, Quilting Collage, quilting stores, Romantic florals, room decor, Sis Boom Style, Westminster, whole cloth •
5 Comments »
March 28, 2013 by Jennifer Paganelli
Join us on facebook, we sell so many beautiful items there and I don’t want you to miss out. It is so exciting. I have my handmade items there and we sell clothing and lots of other assorted goodies. it’s like one big party. Sis Boom on facebook..don’t miss the fun things. This handmade bouquet with tulle and pearls is $75.00 , the paper bouquet is 92.00 and this lovely dress in size small (7/8) $65.00 everything is final sale. So much fun..do not miss out..big squeeze to all of you. oh and I sell and fabric too!!!! So follow!!


Tags: Blue, Fabric, facebook pink, for sale, green, items for sale, Sia Boom
Categories: Circa, downloadable Patterns PDF, Dress Patterns, facebook, fat quarters, floral fabric, flower bouquet, Freespirit, garland, glitter, Happy Home, Happy Home Chronicle Publication, Quilt Magazines, Quilt squares, quilted handbag, Quilting, Quilting Collage, quilting fabric westminster, sale, sewing, Sewing lessons, Sewing tutorials, Sewn Hats, Sis Boom Fabric, Sis Boom Fabric Designs, Sis Boom in the world, Sis Boom Style, Super Fly, Westminster, whole cloth •
Comments Off on Just letting you know..