February 14, 2011 by Madeline Rhodes
Ok, Ok.. last one — we promise… for today, that is 🙂
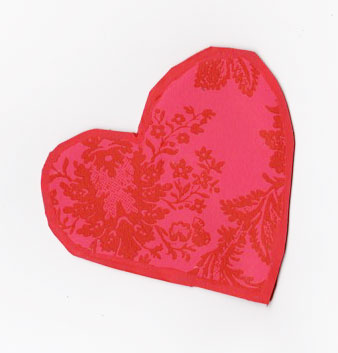
We hope you’re loving these tutorials as much as we are! This one is for all you love birds out there. It’s so super sweet and cheerful. With the downloadable pieces below you can build your very own lovebird set. Awesome, right? Scroll down after photos for tutorial directions!

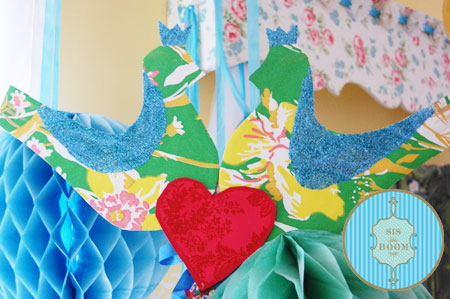
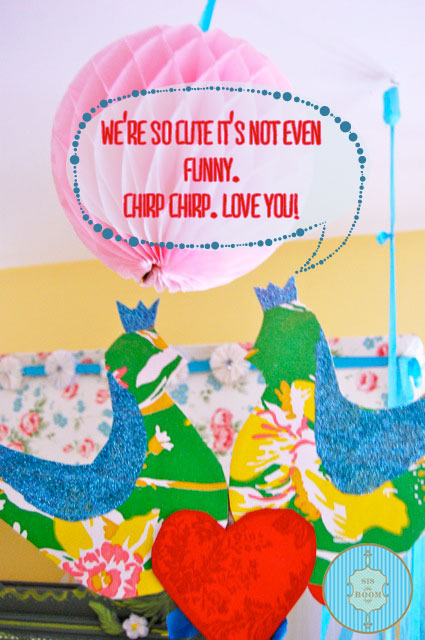
- Print out the following templates on cardstock (see below).
- Cut out the beautiful birds and the luscious heart.
- Mod podge the glittery areas of the birds (their back and crown) and sprinkle your favorite glitter in these areas.
- Using a hot glue gun glue the heart to each bird, joining all three pieces.
- Attach a beautiful bow to the base of the heart for added beauty.
- To prop your lovebirds up, attach a dowel or rod either to each bird’s center individually (on the back), or where each bird meets the heart (on the back).
- Viola, you’ve got yourself a pair of lovely LOVE birds!!!

Tags: Glitter, Hearts, Love Birds
Categories: February, Love, Studio, Tutorial, Valentine •
3 Comments »
February 14, 2011 by Madeline Rhodes
We can’t stop posting HEARTS for you lovely ladies & gents!!!!
Jen is cranking out all of these amazing heartsy, Valentinesy creations… and we LOVE sharing them with you! We’ll surely share more heartsy, lovey crafts & tutorials after today, since we see the entire month of February as the month of L-O-V-E… but today is just a very special day for hearts 🙂
Below we’ve featured a floral burlap heart that screams, “SPRING LOVE!”… How fresh and vibrant!?… below the featured floral burlap photo is a gallery of the entire burlap heart collection designed by Jennifer (click to enlarge photos!)- Enjoy!. How romantic!

Tags: Burlap, floral, red ribbon
Categories: February, Love, Studio, Valentine •
7 Comments »
February 14, 2011 by Madeline Rhodes
It’s V-day… and so there’s no such thing as posting TOO many heart photos! Hearts in all different shapes, sizes and materials is pretty much what got us so super excited for this month of LOVE! Enjoy these romantic, burlap hearts. Jennifer assigned a special filigree to each burlap heart, which makes every one stand out in its own special way. Whaddya think?! awesome, right?!
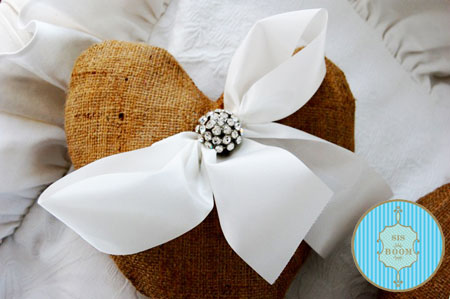
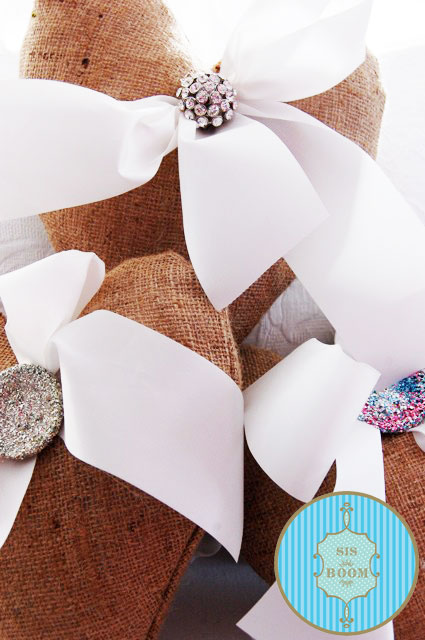
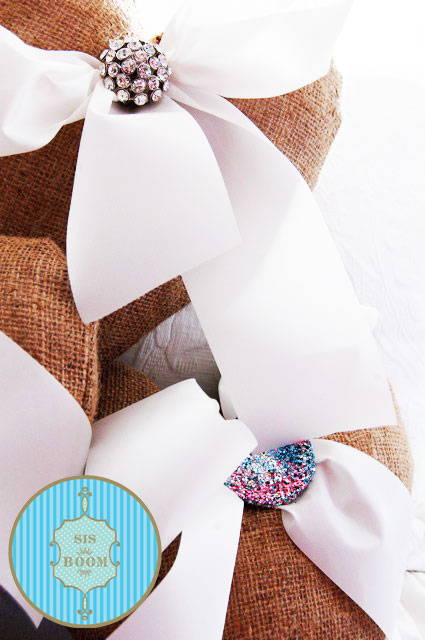
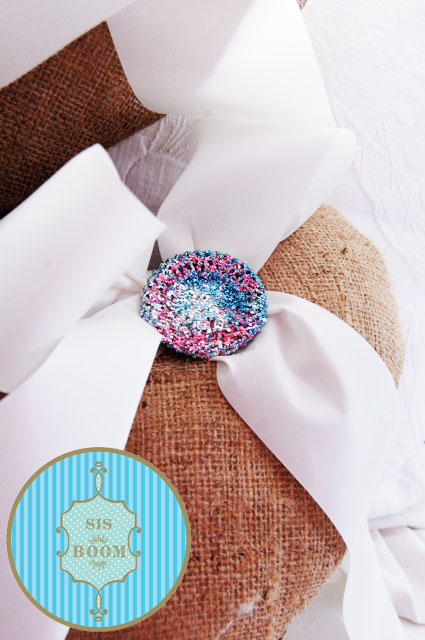
Tags: Burlap, Hearts
Categories: February, Love, Studio, Valentine •
3 Comments »
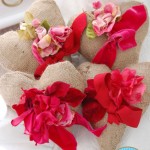
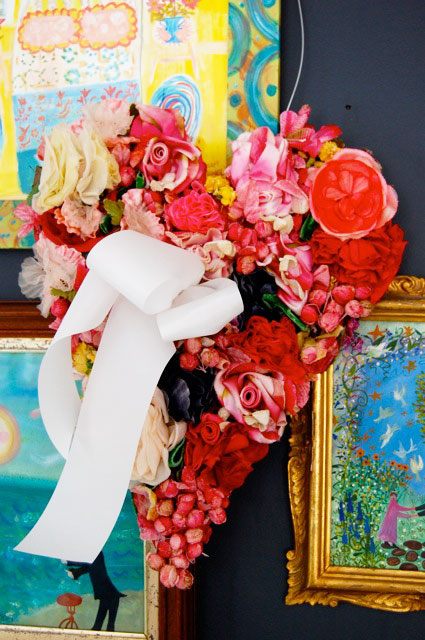
February 14, 2011 by Madeline Rhodes
Just a very special hello during this very special February day!!! We hope your day is full of even more beauty than this striking floral heart that Jennifer hand crafted.
Doesn’t it just make you want to stop and smell the roses?! It is so full of life, energy and love. We Knew it would make you smile.
Write in and let us know how your Valentine’s Day is going! Let’s spread the love! Oh, and yes, That is a Barbara Strawser cluster of paintings in the back! We just can’t help ourselves!
Tags: Barbara Strawser, Flowers, Hearts
Categories: Love, Studio, Valentine •
5 Comments »
February 14, 2011 by Madeline Rhodes
Good Morning to all… and HAPPY VALENTINE’S DAY!!!! We hope that your mornings are all off to a lovely start and that your day has in store for you nothing but hearts, chocolates roses, and ALL things happy!!!
To kick off the special day we have a super simple, super fun garland tutorial for you! It requires a 1 1/2″ punch, dental floss, a hot glue gun… and lots of love. Quick– go whip one up and surprise him either when he wakes up, or when he gets home tonight! yay!
PS, we know you can’t help but to notice the awesome Barbara Strawser Mermaid panel…. Sigh. So beautiful, right? and… we can’t say much more, but you’ll be seeing more than just a sneak peak of that Queen Street headboard in a few weeks or so… xo Have a wonderful day! See tutorial below!!!
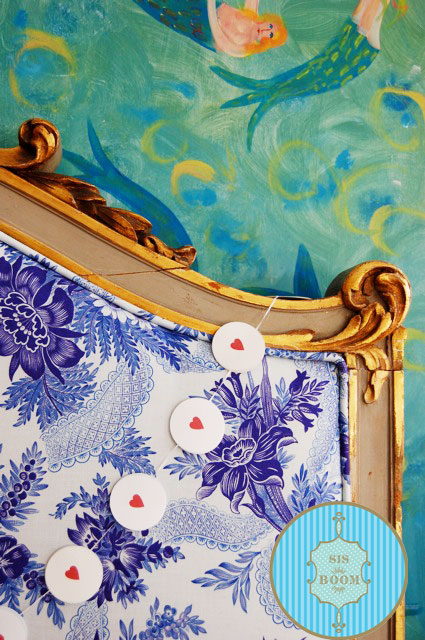
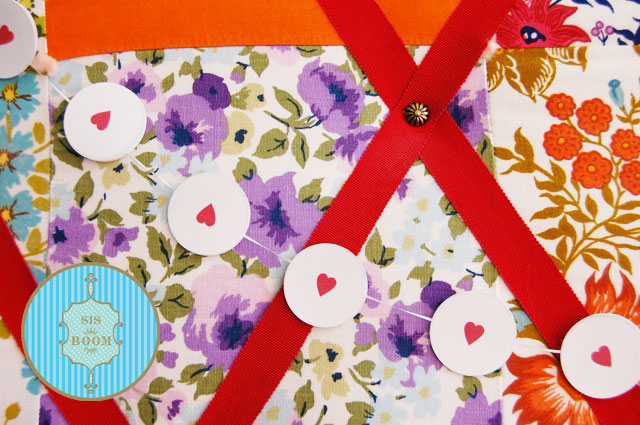

To create your own:
- Download the Heart circles PDF by clicking on any of the above images
- Print out Heart Circles and either punch them out with a 1 1/2″ punch OR use a scissor to cut those babies out
- Take a piece of dental floss and hot glue gun your heart circles back to back with the dental floss between them!
- Hang this lovely creation wherever your heart desires
- Have fun!
Tags: Barbara Strawser, Garland, Hearts, Surprise
Categories: Love, Queen Street, Tutorial, Valentine •
2 Comments »
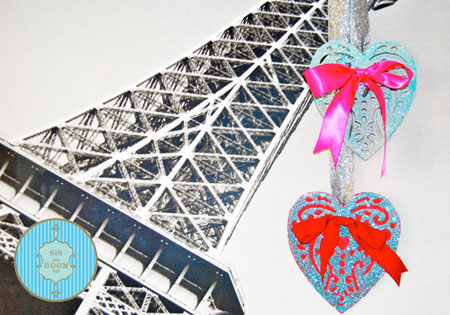
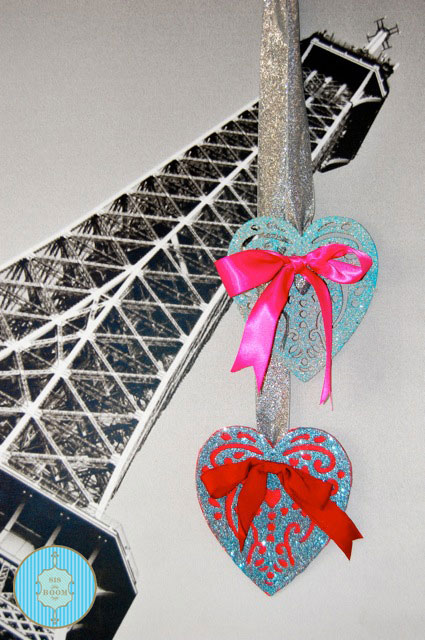
February 11, 2011 by Madeline Rhodes
What makes us happier than glitter? …. and lots of it? These super cool dangling glitter hearts are one of our fave projects this February… They’re laser cut hearts (one has been backed with red felt to add a pop of color), and they are sure to make your honey smile.
Michaels often has loads of them, and once they’re glittered they become so special. In order to get them glistening in glitter, just modpodge the surface and add your favorite glitters. For an extra special touch add a bow!! When all was said and done, we couldn’t resist photographing our hearts in the city of LOVE!… (Eifell Tower curtesy of Ikea)
Tags: Glitter, Laser cut, love
Categories: February, Love, Studio, Valentine •
3 Comments »
February 9, 2011 by Madeline Rhodes
Seems like Bouquets are the Sis Boom way to say, I LOVE YOU, this Valentine’s day. There’s something so sweet about presenting a bouquet… like a wrapped up story of love represented by color, texture, and fun! The other important piece in this photo that screams out LOVE?!… The tiny angel & sheep painting by our lovely and amazing friend, Barbara Strawser… how precious?
If you’re into this sweet circle bouquet, this is one you can make at home in just a few minutes (see tutorial below)! Have FUN!
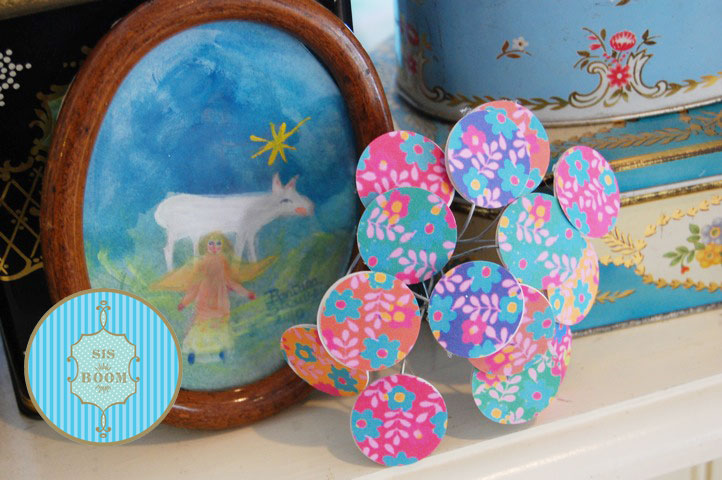
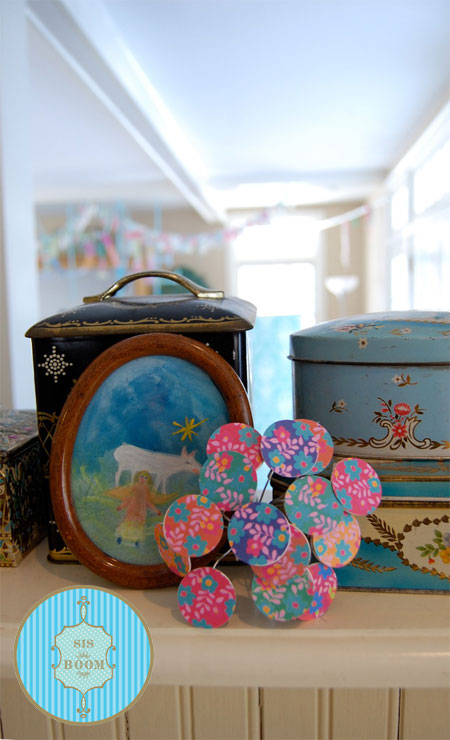
- Download the PDF of circles (by clicking on either image below).
- Print out the circles (we used photo paper to get a nice, glossy finish).
- Cut out the circles (or punch ’em out, if you have one of those handy punches!!).
- Using a thin wire, cut about 12 pieces all the same length (depending on how long you’d like your ‘stems’). Glue your circles back to back, with the piece of wire in between, and then tie all of your wire stems together with a special bow!
- Perfecto!
Tags: angel, Barbara Strawser, Bouquet, sheep, Tutorial
Categories: Love, Tutorial, Valentine •
2 Comments »
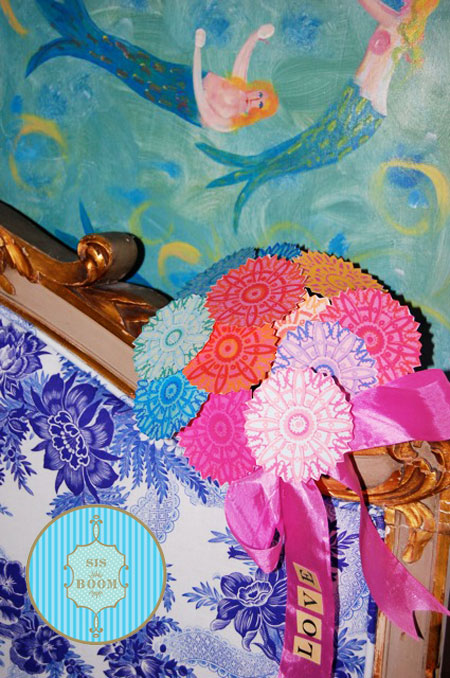
February 7, 2011 by Madeline Rhodes
Featured in our Fun, Free, Fabulous newsletter this morning (Don’t get it? Sign up HERE – It will take 2 seconds!), is this awesome, Schoolyard Valentine Bouquet!!!
Made by Jennifer with tons of love, this adorable bouquet says, “I LOVE YOU” the old school way. I’ts super sweet, a tad flirty, and bursting with color!!! See tutorial below & make your very own! Have fun!

- Download the PDF Schoolyard Valentine Collage (simply by clicking on the image above)
- Print out about 4 sheets on a thick card stock
- Use a 2″ heart punch to punch out your heart ‘flowers’
- Glue hearts back to back on wire stem
- Bend the wire to make it look like a bouquet, shape as desired
- Add a filigree as the focal point of your bouquet!! (buttons, pom-poms & marbles are just a few ideas!)
Tags: Bouquet, I love you, Schoolyard Valentine
Categories: February, Love, Studio, Tutorial, Valentine •
17 Comments »
February 5, 2011 by Madeline Rhodes
Say I Love You with a sweet Forget Me Not Bouquet. Paired with silky seam binding and velvet on a floral heart, this one’s packed with love and tenderness.
Dangle a precious collection like this from a powder room mirror, a doorknob… how about as sweet little cake toppers?! Or cupcake toppers?! (you know you just got excited!!!!)
How? When you’re gluing your heart backing on, sneak a super thin piece of wire, or even a toothpick between the layers, apply your glue, and press together! Totally, cute, eh?
To make a dangling heart, place a piece of seambinding ribbon between two hearts, glue them together & add your posy with a thin piece of velvet. voila!!!

The possibilities are limitless… these little Valentine traditions will look awesome anywhere that calls for a little touch of love. Sigh. So sweet!
Tags: Craft, Forget Me Not, love, Valentine
Categories: Love, Valentine •
6 Comments »
February 3, 2011 by Madeline Rhodes
This one’s for all of YOU out there!!! What better way to say, “I LOVE YOU”, than with a sweet, colorful bouquet?!
By incorporating all happy colors, this one won’t have to be tucked away with the rest of your pink and red decorations after February 14th. It’s the perfect color palette to welcome spring… and the perfect color palette to put a smile on your face each day you pass by it.
To Make your own:
- Download the PDF, simply by clicking on the image above
- Print & Cut out your “flowers”
- With a hot glue gun, use pipe cleaners, wire from hangers, or any other like object, and secure the back of the paper “flower” to a flattened piece of the pipe cleaner or wire
- Repeat until you have your desired number of flowers
- Tie them all up in a beautiful bow with a happy ribbon
- Use letter stickers, if you have them around, to spell something special out in the ribbon!
- Viola!
Tags: Bouquet, Flowers, Tutorial, Valentine
Categories: Love, Studio, Tutorial, Valentine •
7 Comments »